
Xgrid POV-Ray Movie
By: James Reynolds - Revised: 2007-03-28 jamesIntroduction
In order to fully test Xgrid, we wanted to do some actual production work using it on a small set of test computers. Since I am very familiar with LDraw and POV-Ray, and after Daniel Côté published his article on using POV-Ray and Xgrid, it seemed natural to create a movie of LDraw models rendered by POV-Ray.POV-Ray rendered movie
In order to fully test Xgrid, we wanted to do some actual production work using it on a small set of test computers. Since I am very familiar with LDraw and POV-Ray, and after Daniel Côté published his article on using POV-Ray and Xgrid, it seemed natural to create a movie of LDraw models rendered by POV-Ray.It was child's play to set up our own grid using POV-Ray. Using the LDraw tools, the LDraw to POV-Ray conversion tool, L3P, and models by Mladen Pejic, it was easy to come up with content to render.
So we put our grid to work and came up with this movie (QuickTime 6 required):
Low quality (not worth downloading)
–
MP4-File,
323.8 KB
Medium quality
–
MP4-File,
2.0 MB
High quality
–
MP4-File,
6.7 MB
NOTE: the original rendered images were actually 1280 by 960. We have a full size movie, but it is 188 MB and only plays correctly on a fast computer like a G5 anyway. If you are really interested in it, email us.
Exactly how did I make the movie?
So how can you make the movie? I used several custom scripts and many tools. I have provided links to the tools, and you can view or download the scripts I used from this page as well. You should remove ".txt" from the end of the script files. You should also make sure that the scripts are executable before trying to run them. So, here are the steps:First, download the LDraw parts, L3P, and some model files. You can also find model files at Brickshelf
Second, use script 1 to convert the LDraw model files (".ldr", ".mpd", or ".dat") to POV-Ray format (".pov"). The script also rotates the camera around the model as it converts the model file. I let L3P choose how close to get to the model since it picked rather dramatic views over a fixed distance rotation. I also let it choose where to put the floor on models with a floor, which was the easiest, but put some unneeded air underneath most of them. It is possible to fix this. Use L3P Launcher to learn how to use L3P better.
I was rendering 26 model files, rotating 360 degrees around each model, with steps of 2 degrees each. This generated 4706 files (26 x 181). I saved these files to my ~/Sites folder, so that they could be downloaded by the Xgrid agents using curl. (NOTE: In Technical Preview 1, I could not send the 4706 pov files to the controller because the job would timeout; my workaround was to have the agents download them so Xgrid didn't have to distribute them).
Third, install Xgrid and POV-Ray on all agents. Run the Xgrid installer on each agent (or use whatever software management tools you have, like Apple Remote Desktop or Radmind. Then copy the password files and the Xgrid prefs that you created on your first agent to the other agents.
To install POV-Ray, install Apple's Developer tools, Darwin Ports, and finally POV-Ray ( by typing 'sudo ports install povray' in the terminal) onto one Mac (Daniel Côté's article really helped me out here).
Then I copied the POV-Ray binary to a second Mac and found out what extra libraries were required by just running it and looking at the error messages (I know there is an easier way to do it, but I didn't do it). I ended up needing these files:
/opt/local/bin/povray
/opt/local/etc/povray.conf
/opt/local/etc/povray.ini
/opt/local/lib/libjpeg.62.0.0.dylib
/opt/local/lib/libjpeg.62.dylib (link)
/opt/local/lib/libpng.3.1.2.5.dylib
/opt/local/lib/libpng.3.dylib (link)
/opt/local/lib/libtiff.3.6.1.dylib
/usr/X11R6/lib/libX11.6.2.dylib
/usr/X11R6/lib/libX11.6.dylib (link)
Fourth, enable Web Sharing (Apache) on your computer in the System Preferences, Sharing Pane. This will make it so that the the pov files you saved earlier can be given to agents over the web. Then use these 2 cgi perl scripts to make agent jobs work nicer. Copy them to /Library/WebServer/CGI-Executables and make sure they are executable (you will need to use the command line to do that--oh, and you should move them out to your home folder when you are done).
Script 2 just checks to see if the file that the agent is going to create is already created. Script 3 actually uploads the rendered image to the webserver. I did this because in Xgrid Technical Preview 1, the GridServer constantly crashed doing this job. I believe it would crash because it tried to keep the results of the jobs in memory until the job finished. That was a whopping 1.1 GB for my job... My workaround was to upload the rendered files to the webserver. A bonus of this is that it made it easy to not duplicate rendered jobs as well (the first cgi script).
Fifth, use script 4 to run the jobs on the agents. Naturally, for this script to work, POV-Ray has to be on each agent. The agents also have to be 10.3.x because the script uses /usr/bin/sips (Mac OS X 10.3.x only) to create a thumbnail image.
Then, create this Xgrid plugin:
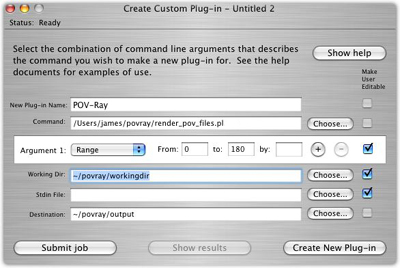
That is, "Command" is the "render_pov_files.pl" script. Pick an empty folder for the "Working Dir" (you might not need to do this, but do it anyway). Pick an empty directory for the "Destination" (that is so you can get the output of the command script). The range is 0 to 180. So the total jobs are 181.
I got this number because of the way render_pov_files.pl decides how to render the jobs. At first I tried to render all 4706 files. In other words, I used a range from 1 to 4706. This didn't work. So I decided each job would do 26 renders (one frame of each model) because that was an easy number to divide up 4706. If the job died early (which it did because I had an agent with a full hard disk and it screwed up every job it was given, and it grabbed alot of them), then I just changed the start job number to the last number of successfully rendered images.
Finally, after all of the images are rendered and uploaded, use script 5 to turn the rendered images into QuickTime movies. Then decide which models you want and put them in the order by copying and pasting in QuickTime Pro or convert them to DV streams with QuickTime Pro and import them into iMovie.
I created my neato title graphic with Adobe ImageReady, I found a tune from FreePlay music (Techno Vol 1, Highway Patrol). I had to crop the tune a bit. Then I threw it together in QuickTime Pro, exported as MPEG4, and there you have it.
Script 1
–
TXT-File,
3.5 KB
Script 2
–
TXT-File,
1.2 KB
Script 3
–
TXT-File,
2.0 KB
Script 4
–
TXT-File,
6.3 KB
Script 5
–
TXT-File,
0.9 KB
- Documentation
- Administration
- Backup Overview
- CrashPlan Pro
- Data Rescue II
- Data Sanitation
- BRU
- Enterprise Deployment
- Iceberg
- Intro to Mac Mgmt
- Mac OS X on Campus
- Keyserver 6
- KeyServer
- LanSchool
- Local MCX
- MPP
- Nagios Class
- Network Time
- Non Admins Scripts
- Parallel Computing
- Patch Management
- Power Management
- Power Save Mac
- Software Installation
- SpamAssassin
- Poorly-Made Apps
- Xgrid
- Authentication
- General Software
- Hardware
- Miscellaneous
- Multimedia
- Networking
- Operating Systems
- Outside Presentations
- Programming & Scripting
- Security
- Servers
- Short Courses
- System Deployment
- System Utilities
- What's New
![]() ©2022 - University of Utah -
Marriott Library -
ITS - Apple Infrastructure
©2022 - University of Utah -
Marriott Library -
ITS - Apple Infrastructure
Disclaimer - 295 South 1500 East, Room 1705J, SLC, UT 84112 - 801.581.6494