
Sherlock Utilities and Creating Plugins
By: Mikio Moriyasu - Revised: 2006-06-21 devinIntroduction
Learn how to use Apple's Find program and create custom tools for it. Note: The information provided in this document pertains to Sherlock version 1 which was introduced with Mac OS 8.5. While the information on Sherlock's operation and the instructions on how to create Plug-ins should still be generally accurate, please be aware that they may not be completely relevant to Sherlock version 2 and Mac OS 9.0.
Click here for the most recent ACLIS Labs Sherlock Plugin
–
HQX-File,
4.6 KB
Section Links
Sherlock Overview
Sherlock is the file- and web-searching utility that comes with Mac OS 8.5x and higher. It has many advanced searching capabilities, including the ability to search files by their content rather than simply by their title or date.The application also has the ability to contact multiple WWW Search engines in one search using plugins designed for each of the engines. It can search multiple search engines at once, so instead of searching for the same phrase on many different search pages, you can just select as many as you want to search, and Sherlock will return the search results in an easy-to-read format.
Therefore, if you have a search engine on your page, you can create these Sherlock Plugins to search your page. You just need to know the exact address at which your search engine can be contacted.
Sherlock Set Utilities
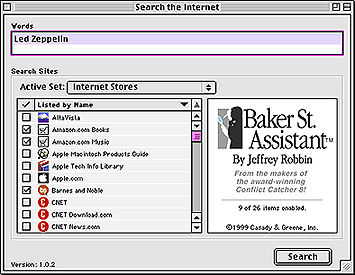
There are utilities available which allow you to create sets of plugins. For example, if you only want to search Internet Stores (such as Amazon, Barnes & Noble, Music Boulevard, etc.), you can save a set of selected plugins to search with, rather than re-selecting all of the plugins in Sherlock.The best of these set creators is probably the Baker Street Assistant, written by Casady & Greene, the creators of the Conflict Catcher. (link dead)
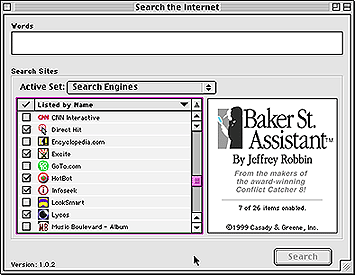
When you open the Assistant, it will give you the default set that Sherlock normally opens with. Again, if you want to search only Internet stores, just check off the plugins you want to search with, and uncheck the plugins you don't want to use. Then go under the "Sets" menu and select "Save Set As..." To create another set, just deselect the current plugins and re-select the new ones, then select "Save Set As" and choose a new name.

To search using one of your sets, just select the set you wish to use, enter in a term to search for in the "Words" box, and click Search or hit Enter. This will open Sherlock and display the results as usual.
Other Sherlock Utilities
 There is a utility called "Sherlock Tester" which tests to make sure all the code in a plugin is correct. If you drag-and-drop a plugin onto the Sherlock Tester, it will generate a report pointing out any errors in the code. You can also drag-and-drop an entire folder of plugins onto the application, and it will test all of them. If you simply double-click the application, it will test all of the plugins in the Internet Search Sites folder in your system folder.
 Another useful Sherlock utility is the IconFixer. Many plugins you download off of the web will have custom-made icons, but sometimes when you place them in your Internet Search Sites folder, the custom icon is replaced with the default plugin icon. IconFixer simply restores the original icon
There is a third utility called "Sherlock Generator" which is simply a more graphical way to create plugins - but you still have to enter in all of the same information (shown below) in order to create a plugin.
All of these utilities and more are available at the Apple Donuts site. (link dead)
Creating a Sherlock Plugin
To begin, you must have a site with a search engine and the following items: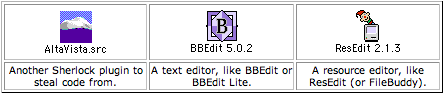
First, go into your System Folder and find the Internet Search Sites folder, then duplicate (Command-D) one of the .src files. Rename the duplicate plugin as desired, leaving the .src suffix.
 Then drag-and-drop the new plugin onto your text editor.
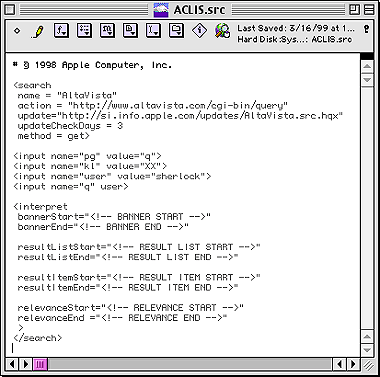
This will open up the source code for the plugin:
Next, you need to change a significant amount of code to switch over to your own search engine and web site.
Step 1: The <search> Tag
The "name" line specifies the name that will appear when you open Sherlock. Change this accordingly.
All of the info that will go into the <search>, <input>, and <interpret> tags can be taken from the HTML files on your site.
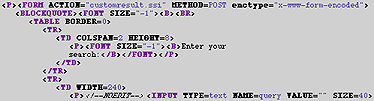
In Netscape, go under "View" and pull down to "Page Source," which will open up the HTML contained in that page. Find where your search engine's address is specified - it will be after the "ACTION" tag. In the case of the MMC, the address is "http://www.aclislabs.utah.edu/customresults.ssi" (you must put the full address into your plugin code!).
Now go back to BBEdit and type this address in after the "action=" Remember to put quotes around the address.
You only need to worry about the "update" lines if you intend to update this plugin frequently, in which case you need to specify the address where the plugin can be re-downloaded (the file MUST be BinHexed (HQX file suffix). Don't use DropStuff for this - it will not only HQX the file, but it will also .SIT the file, which won't work with Sherlock. CompactPro will work (under the Misc. menu). The first "update"line is where you type in the address, and the "updateCheckDays" tells Sherlock to check that address every X number of days for a plugin update.
The "method" information can also be obtained from the HTML code of your Search page, usually right after the "ACTION" tag. This method will vary from server to server, but in our case it is "post."
Here's the edited code so far:
<search
name="ACLIS Search"
action="http://www.aclislabs.utah.edu/customresult.ssi"
update="http://www.macos.utah.edu/documentation/sherlock/ACLIS.src.hqx"
updateCheckDays = 30
method=post
>
name="ACLIS Search"
action="http://www.aclislabs.utah.edu/customresult.ssi"
update="http://www.macos.utah.edu/documentation/sherlock/ACLIS.src.hqx"
updateCheckDays = 30
method=post
>
Step 2: The <input> Tags
This is where you specify the parameters of the search engine. The more options you have available on your search page (such as search restrictors, result layout options, or the number of results to show), the more <input> tags you'll need. Again, all of this info can be obtained from the HTML source. Somewhere in the <FORM> tags you can find the name, type, and values you'll need to enter. On the MMC search page we don't have any special options, so that luckily makes the Sherlock plugin fairly simple. I only needed to specify the name, which is "query" in one <input> tag, followed by "user":
This is where you specify the parameters of the search engine. The more options you have available on your search page (such as search restrictors, result layout options, or the number of results to show), the more <input> tags you'll need. Again, all of this info can be obtained from the HTML source. Somewhere in the <FORM> tags you can find the name, type, and values you'll need to enter. On the MMC search page we don't have any special options, so that luckily makes the Sherlock plugin fairly simple. I only needed to specify the name, which is "query" in one <input> tag, followed by "user":
<input name="query" user>
Step 3: The <interpret> Tags
Writing the <interpret> tags is tricky - it requires a detailed analysis of your site's HTML tags. You need to look at all of your pages and find tags that are shared by ALL of the pages you want to search. So if your pages don't have a common layout, this can be really tricky.
For example, if you don't want to include a certain part of your page in the search (such as a menubar on the top or side), you need to enter in the HTML tags at the beginning and end of the area you want searched. These tags are called "resultListStart" and "resultListEnd":
resultListStart='<HR SIZE=1 WIDTH="85%">'
resultListEnd="</BODY>"
resultListEnd="</BODY>"
So Sherlock will search everything between those two tags.
There are many other <interpret> tags you can specify, but the main ones you need to worry about are the "resultList" tags. You can also specify the HTML tags that normally surround the results when you do a search on your pages, though I personally found that my plugin worked better if I left these tags off. This also requires finding a pattern in the HTML tags that you can put into your plugin code.
These tags are called "resultItemStart" and "resultItemEnd":
resultItemStart='<FONT SIZE="-2">'
resultItemEnd ="</FONT>"
resultItemEnd ="</FONT>"
This did work in my plugin, but I got better results when I omitted them from my code (by the way, you can use the # to comment lines out of your code if you want to see if the code works without them).
If you want advertising banners to appear in the Sherlock results window, you can use the "bannerStart" and "bannerEnd" tags. You just need to supply the HTML from above and below the banner you want displayed.
To finish your plugin off, make sure you end the code with </search>.
So here's the code from the plugin I created (Please note I "#" out the "resultItemStart" tags):
# © 1999 ACLIS Mac Support
# University of Utah
<search
name="ACLIS Labs Search"
action="http://www.aclislabs.utah.edu/customresult.ssi"
update="http://www.macos.utah.edu/documentation/sherlock/ACLIS.src.hqx"
updateCheckDays = 30
method=post
>
<input name="dummy" value="Search">
<input name="numdocs" value="15">
<input name="query" user>
<interpret
resultListStart='<HR SIZE=1 WIDTH="85%">'
resultListEnd="</BODY>"
# resultItemStart='<FONT SIZE="-2">'
# resultItemEnd ="</FONT>"
>
</search>
 Note: If you duplicated an existing plugin to create your own plugin, you don't need to worry about using ResEdit to fix the file's type and creator.
If you started completely from scratch with a text editor, you'll need to use ResEdit. Open up ResEdit and go under the File menu to "Get File/Folder Info..." You'll then need to change the type to "issp" and the creator to "fndf". This will make it so your plugin will be recognized by Sherlock.
There is a utility that does this automatically. It is called "Watson" and it is available at the Apple Donuts site. (link dead)
![]() © - University of Utah -
Marriott Library -
ITS - Apple Infrastructure
© - University of Utah -
Marriott Library -
ITS - Apple Infrastructure
Disclaimer - 295 South 1500 East, Room 1705J, SLC, UT 84112 - 801.581.6494