
Enabling and Securing SSH
By: James Reynolds - Revised: 2006-07-27 devinDownload Slides
–
PDF-File,
213.6 KB
Introduction
Discusses the dangers of having SSH enabled on a computer as well as recommended precautions such as disabling protocol 1, setting up user access lists, setting up IP access lists, changing the default port, and turning on the firewall.Section Links
SSH
In System Preferences, in the Sharing Pane, is a simple checkbox labeled "Remote Login". Click it, and you have SSH turned on! That was easy. But what if that computer has user accounts on it? It is likely at least one user has a weak password and that means you just unlocked your computer to be hacked. In the good old days, SSH meant security. But googling for "mac os x ssh compromise" shows many interesting finds:- "Weak passwords for SSH and other remote access services can and often do allow unwanted access to a computer" - TruSecure
- "The machine likely was broken into by someone running a script that repeatedly submitted various, commonly-selected usernames and passwords until it found the right combination to log into an account with administrative privileges on that Macintosh via Remote Login (SSH)." - Berkeley list mail
- "A certain institution of higher learning has discovered that fleets of their OS X boxes have been compromised... through weak passwords for SSH-enabled accounts... Use of remote root login, especially to boxes connected to the Internet, has to be one of the absolute dumbest ideas of all time. - The OS X Zombies
First, TURN OFF SSH.
Second, if you must have it on, be sure to take the precautions discussed in this article.
Disable Protocol 1
This is very easy. Protocol 1 is known to be insecure. Just turn it off:Edit /etc/sshd_config and change
#Protocol 2,1
To
Protocol 2
Restart SSH.
The default values are commented out. So to change the default values, uncomment the line (remove "#") and then change the value. In this case, remove the ",1".
Add "AllowUsers"
This, IMO, is probably the best change you can make. It makes it so that only users in the allowed list can have access. Of course, you should make sure that user has a strong password.Edit /etc/sshd_config and at end of file, add:
AllowUsers name1 name2 etc
Restart SSH.
Just list the usernames of allowed users, separated by spaces.
Enable TCP-Wrappers/xinetd
TCP-Wrappers is an IP allow list for certain services. It is really easy to enable. This example is a mostly closed example. That means that all IP's are denied except for a few.You can make a mostly open config, but that implies that you are going to block specific IP's and allow everything else. Unless you know of a specific IP that is bugging you, a mostly-open list is probably useless because there is no real way to predict where a scan will come from. You can find lists on the internet, but it changes often. So if you want to block IP's, a mostly closed is the best idea.
To make a mostly-closed setup, create: /etc/hosts.deny
ALL:ALL:deny
And create: /etc/hosts.allow
ALL:10.0.1.
ALL:10.0.2.1
The hosts.allow file lists the IP's or subnets of allowed computers.
Note, xinetd, will use the TCP-Wrapper files if they exist. We also have more info on TCP-Wrappers.
Enable Firewall (IPFW)
The firewall is a lot like TCP-Wrappers, except it is at the kernel level, where TCP-Wrappers is software level. And fewer services use TCP-Wrappers, so with TCP-Wrappers, you aren't going to be blocking iChat by using a mostly closed set up. But the firewall is system wide. So a mostly closed firewall WILL block iChat unless you specifically open it.On both Mac OS X client and Mac OS X Server there are GUI's to configure the firewall. Both are mostly closed, meaning that all ports are blocked, and then you have to go poke holes for allowed services. Mac OS X Server is more configurable, so you can change this I believe in the GUI. But to change this for Mac OS X client, you have to configure IPFW manually.
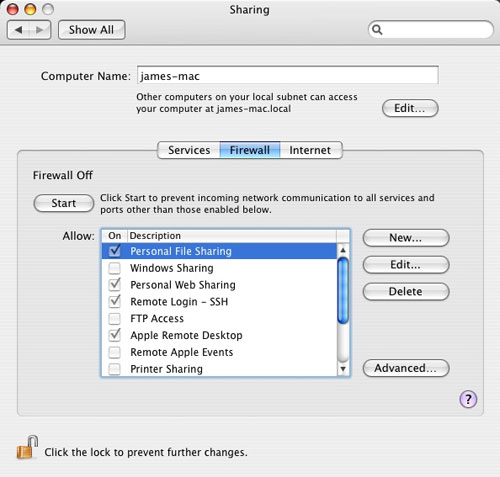
On Mac OS X client, the GUI to configure firewall is System Preferences->Sharing->Firewall tab. The main problem with this GUI is that when you poke a hole for a service, it is open to the world. You can't poke it open for certain IP's.
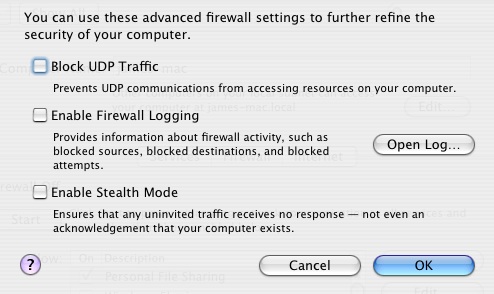
In the advanced sheet, you can turn on a few options. Stealth settings make it so that if the computer is scanned, it will not answer back at all, making it look like it isn't there. This also makes it so that utilities like Apple Remote Desktop can not see it though. Also "stealth" settings in 10.4.3 and earlier because it might trigger a lookupd bug, which will hang the computer... I'm not sure about the GUI, but manual settings will.
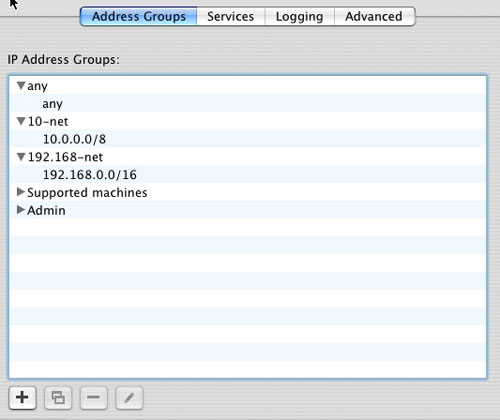
On Mac OS X Server (10.4) you have more options. You enable the firewall in Server Admin. In the Firewall service you have several tabs. The address group is where you set up different groups to set different rules. It also shows several groups setup already. The "any" group has "any" for IP, which is a valid setting for IPFW which means, "any" of course. 10-net and 192.168-net are private nets that is good to have rules for.
To block SSH for the world but allow it for certain IP's, you create a group name and then give it IP's that belong to that group (the "/8" numbers at the end of an IP make the IP a range--the GUI will spell it out for you so you know exactly which IP's you are setting up). In the images below, we setup a group for the machines we support ("Supported machines") and a group for our admin subnet ("Admin").
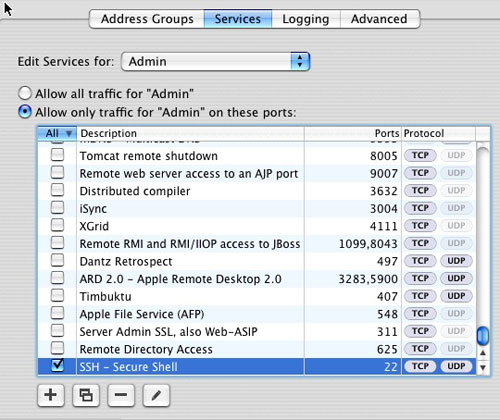
Then, in the Services pane, we edited the service for the Admin group and enabled SSH. We left it disabled for the "any" group and the "Supported machines" group. Although not shown here, we enabled services in the "Supported machines" group for the services we wanted to make available only to our computers. Any services we wanted available to the world we enabled in the "any" group.
A warning about Mac OS X Server firewall. You have to leave the serial number support in the "any" group or else the server locks down and you can't even go in and edit the firewall. However, you can execute this command in the terminal and it might open it back up: "sudo ipfw flush".
Lastly, you can configure IPFW manually, without the built-in GUI's. This is what you do if you want a mostly open setup on Mac OS X client or if you want to have more detailed access controls. We use mostly open because we tried mostly closed and all of a sudden things quit working. Instead of debugging them all, we just block the services we don't want available outside our admin subnet (SSH, ARD, etc).
IPFW isn't a service that reads a config file when it starts up. Because it resides in the kernel, it actually has to be modified with a command, the /sbin/ipfw command. So the way you set it up is to run a script at startup that calls the IPFW commands.
#!/bin/sh
/sbin/ipfw -f flush #get rid of all old rules
# private ip stuff
/sbin/ipfw add allow all from any to any via lo0
/sbin/ipfw add deny log ip from 192.168.0.0/16 to any in via en0
/sbin/ipfw add deny log ip from 172.16.0.0/12 to any in via en0
/sbin/ipfw add deny log ip from 10.0.0.0/8 to any in via en0
/sbin/ipfw add deny log ip from any to 192.168.0.0/16 in via en0
/sbin/ipfw add deny log ip from any to 172.16.0.0/12 in via en0
/sbin/ipfw add deny log ip from any to 10.0.0.0/8 in via en0
# allow admin subnet here
/sbin/ipfw add allow ip from 123.123.123.0/24 to any
# block ssh here
/sbin/ipfw add reset tcp from any to any 22 in #(change this if you changed port--next section)
# mostly open rule
/sbin/ipfw add 65535 allow ip from any to any
Change the SSH port
Edit /etc/sshd_config and change#Port 22
To
Port 1234 (pick any port within reason, not 1234 or 12345...)
Second, in 10.4, when SSH is "enabled", it actually isn't running until someone actually tries to connect to it. This is managed with launchd. Essentially, launchd listens on port 22 (the default SSH port). When someone tries to connect to it, launchd launches sshd. So to change the port SSH runs on, you need to change the launchd configuration for SSH.
You can do that a few ways. You can edit /System/Library/LaunchDaemons/ssh.plist and change the value for the SockServiceName key to a port number (I believe that will work--I haven't tested it), or you can edit /etc/services and change:
ssh 22/udp # SSH Remote Login Protocol
ssh 22/tcp # SSH Remote Login Protocol
To
ssh 1234/udp # SSH Remote Login Protocol
ssh 1234/tcp # SSH Remote Login Protocol
(This change might cause other problems, so you might not want to do it on a server for example, it would be better to edit the launchd ssh.plist file.)
If you change SHH port, modify the firewall settings to block the changed port!
Autoscan ports with Nmap
With NMAP, you can scan your computers and make sure new ports don't open up (because that is what bad people usually do when they compromise a computer). And a bonus is that you can do some monitoring of yourself. I've turned on SSH or other services on a computer and forgotten to turn them off. Scanning is a great way to keep yourself safe.See our Nmap page for more info.
One warning.... Don't use nmap on < 10.4.2 (10.4.3?). There is a lookupd bug that hangs the machine running nmap... I haven't tested on 10.4.3 yet.
Autoscan /var/log/system.log
This is another easy, yet very useful thing to do, not just for security, but for everything. Watch your log file!Here is a simple script you can run at startup or when the daily periodic script runs (run this before it backs up the system log) that reads 2 files and creates a 3rd file if there is a problem. The first file is a list of words to look for. The second list is words to ignore. If the 3rd file exists, it is emailed to you. Actually, in this example it emails to the root user. If you forward your root emails to yourself (next section), then you will get the messages.
You can get example alert and watch files from the logcheck tools (you could also use logcheck, but it is a bit more complicated to setup).
#!/bin/sh
rm /path/to/system_log_alert_messages
/usr/bin/grep -i -f /path/to/system_log_watch_messages /var/log/system.log
| /usr/bin/grep -v -f /path/to/system_log_ignore_messages
> /path/to/system_log_alert_messages
if [ -s /path/to/system_log_alert_messages ]; then
/bin/cat /path/to/system_log_alert_messages | /usr/bin/mail -s "System.log report" root
fi
PROBLEM WITH CODE WRAPPING
Here is an example brute force attempt (IP changed to protect the malicious... er to get rid of the line wrap):
Feb 10 07:07:36 localhost sshd[1078]: Illegal user matt from 10.0.1.1
Feb 10 07:07:38 localhost sshd[1080]: Illegal user test from 10.0.1.1
Feb 10 07:07:40 sshd[1082]: Illegal user operator from 10.0.1.1
Feb 10 07:07:42 sshd[1084]: Illegal user wwwrun from 10.0.1.1
Feb 10 07:07:52 sshd[1096]: Illegal user apache from 10.0.1.1
Feb 10 07:07:59 sshd[1104]: Failed password for root from 10.0.1.1 port 58752 ssh2
Feb 10 07:08:01 sshd[1106]: Failed password for root from 10.0.1.1 port 59136 ssh2
Feb 10 07:08:03 sshd[1108]: Failed password for root from 10.0.1.1 port 59176 ssh2
Feb 10 07:08:15 sshd[1122]: Failed password for root from 10.0.1.1 port 60606 ssh2
Redirect root emails to yourself
Edit /var/root/.forward and change/dev/null
To
yourname@yourserver.edu
Perhaps use certs and not passwords
This is good if you use one (secure) computer. It hinges on that computer storing a file that nobody else knows, the private key. So you don't want to put the private key on computers that might become hacked. In my job, I use so many computers that I don't want to use this method. But if you have a setup where you can take advantage of this, it is worth it.In Terminal, type:
ssh-keygen -t rsa
Type a passphrase (not the same as password). You can leave it blank, but it is not recommended. Because if, by chance, the private key DOES get out (you lose your laptop), then no passphrase is a free ticket in to your servers (unless you undo this, which would be the recommended action if the private key becomes public).
Copy contents of ~/.ssh/id_rsa.pub (it should only be one line).
Add it to ~/.ssh/autorized_keys on the server (in the user home folder that you will be connecting as).
- Documentation
- Administration
- Authentication
- General Software
- Hardware
- Miscellaneous
- Multimedia
- Networking
- Operating Systems
- Outside Presentations
- Programming & Scripting
- Security
- Servers
- Short Courses
- System Deployment
- System Utilities
- What's New
![]() © - University of Utah -
Marriott Library -
ITS - Apple Infrastructure
© - University of Utah -
Marriott Library -
ITS - Apple Infrastructure
Disclaimer - 295 South 1500 East, Room 1705J, SLC, UT 84112 - 801.581.6494