
ASR via imageJaguar .75a
By: Scott Doenges - Revised: 2006-05-25 devinIntroduction
Learn how to create and restore an ASR image with imageJaguar.Section Links
Creating an ASR image with imageJaguar.sh
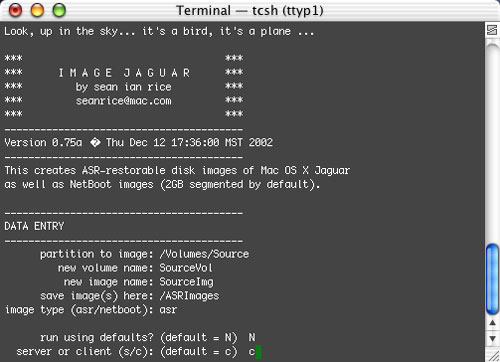
imageJaguar.sh is a shell script that automates many of the steps in cleaning up, creating and restoring ASR and NetBoot images. This is an alpha release, so it still needs quite a bit of work, but I had no problems using it to create or restore ASR images (it also includes a shell script called "restoreJaguar", which does just that). Below is a brief overview of how to use it:First, download imageJaguar. Read through the included PDF manual and perform the necessary installation procedures while booted from your Admin partition/drive.
To run imageJaguar, type the following command in a Terminal window, and enter your Admin password when prompted:
sudo /<path to imageJaguar folder>/imageJaguar.sh
or:
sudo <drag-and-drop the imageJaguar script onto the Terminal window>
It will then ask you which volume you would like to create an image of. Type the path to your Source volume (/Volumes/Source), or drag-and-drop the Source volume onto the Terminal window. Hit enter, then continue through each of the prompts, being careful to enter the proper paths and volume names for your image.
It will give you prompts for many options in creating your ASR image, such as "verify source volume", "boots into Setup Assistant", "clear caches", "erase network settings", "repair permissions", etc.
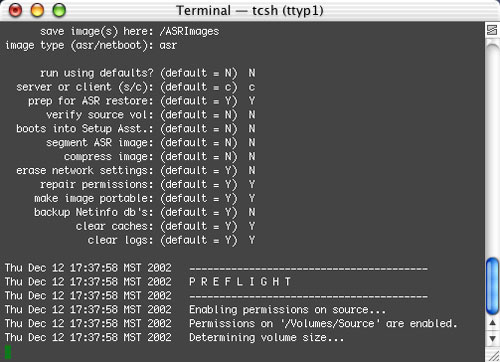
Let it spin its wheels for a while, and it will eventually create an ASR image in the location you specified. This image creation process automates most of the messy Terminal commands used in cleaning up and preparing your ASR image, including image compression, scanning the image for ASR, etc. The image creation process took about 30 minutes to finish imaging and compressing a 4.3 GB volume (which produced a 2.1 GB image).
Restoring ASR image via restoreJaguar.sh
Now try using the restoreJaguar.sh shell script to perform a test-restore to your target volume. To run restoreJaguar, type the following command in a Terminal window, and enter your Admin password when prompted:sudo /<path to imageJaguar folder>/restoreJaguar.sh
or:
sudo <drag-and-drop the restoreJaguar.sh script onto the Terminal window>
You will then be presented with an "image to restore:" prompt. Either type in the path to the image you with to restore, or simply drag-and-drop the image onto the Terminal window. Hit enter, and do the same at the "target volume" prompt. At the "erase target?" prompt, you should always select "yes", since this will make ASR perform a block-copy instead of a slow file-by-file copy.
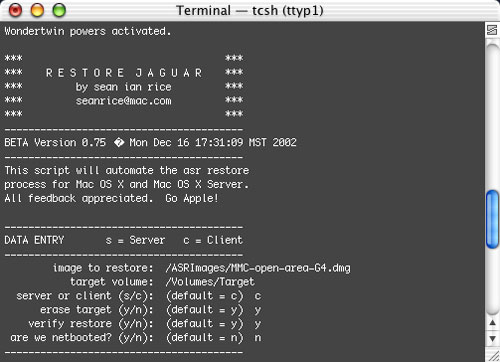
Once you've answered all the prompts, you'll be given a summary of the ASR restore about to be performed. Make sure all is well here, then tell it to proceed, and sit back while it restores your image to the target you selected. A 2.1 GB image only took about 5 minutes to restore.
If you restored to another partition on the same Mac your Source volume is on, after the restore completes you will see two volumes named "Source" (or whatever you called it). You can tell which is the newly-restored volume by the fact that you'll be able to see hidden files and directories (i.e. "var", "tmp", "mach.sym", etc.) at the root of the volume.
Now try booting from the volume you just restored, and do extensive testing to make sure your image works exactly how you want it to. If you find something amiss, boot from your original source volume and fix the problems, then recreate your image and test it again.
Assuming your image works how you intended it to, you're now ready to mass-distribute your image to your clients. Proceed to step 4 on the main page.
- Documentation
- Administration
- Authentication
- General Software
- Hardware
- Miscellaneous
- Multimedia
- Networking
- Operating Systems
- Outside Presentations
- Programming & Scripting
- Security
- Servers
- Short Courses
- System Deployment
- System Utilities
- What's New
![]() © - University of Utah -
Marriott Library -
ITS - Apple Infrastructure
© - University of Utah -
Marriott Library -
ITS - Apple Infrastructure
Disclaimer - 295 South 1500 East, Room 1705J, SLC, UT 84112 - 801.581.6494