
License Control
By: Richard Glaser - Revised: 2006-06-13 devinIntroduction
Learn about keyed and unkeyed license control and how to create a keyed or unkeyed license control.Section Links
Keyed and Unkeyed License Control
All transactions between clients and KeyServer can be logged, so in addition to KeyServer's real-time control of current software usage, you can create usage reports based on the logged data. Although you may find that software usage reports alone suffice to document license compliance, you may want to also use KeyServer's ability to actually control usage.Keyed Programs - Control with security
For secure license metering and piracy prevention, use KeyConfigure to extract a "key" from a program. The key is held by the KeyServer and it is served back to the "keyed" program at launch time, but only if there is a license available. KeyConfigure automatically creates a license Control item for the keyed program and this is where you configure the proper usage limit and other license options.
Unkeyed Programs - Control without security
KeyServer can be configured to control an unkeyed program in almost exactly the same way it controls a keyed program, but the Control item is not created automatically. If you want usage control, you must explicitly create a Control item for the unkeyed program and then configure it in the same way that you configure the Control for a keyed program.
Since a keyed program will not run without getting its key from the KeyServer, it can be freely distributed and copied without risk of piracy. KeyServer cannot protect an unkeyed program from piracy even if KeyServer is set to control its usage. KeyServer makes no attempt to lock down files or to prevent copying; users can copy keyed and unkeyed programs alike and transfer them to other computers or take them offsite. But the keyed programs will not run offsite without permission from KeyServer, while the unkeyed programs will.
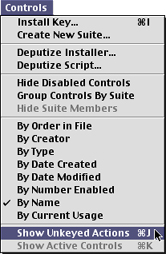
The following dialog will display:

Every time KeyConfigure is launched this window is automatically updated, but unlike the Active Controls and Users windows, there is no scheduled refresh. You must initiate further updates explicitly.
Highlight a red program name in the list and then confirm the ignored action by clicking on the green Set Action button at the top right of the window. The red type will change to black to show that you have explicitly configured this unkeyed program action.
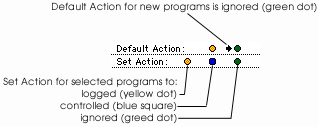
In this example, we select ResEdit and click on the blue Set Action button to create a Control. The following dialog will display:
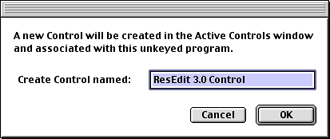
Click OK. Then a new line labeled "ResEdit 2.1.3 Control" will appear in the Active Controls window. The blue square icon indicates that it is a Control for an unkeyed program.
If you launch a copy of this newly controlled program on one of your client computers. You will see the default "post launch message" that confirms KeyServer control. If you double click on the Control for this program in KeyConfigureÕs Active Controls window, or hold down the option key while double clicking on the program name in the Unkeyed Actions window. You can customize or delete the post-launch message under the General tab. Customize the license limit under the Licenses tab.
Creating a Control - Keyed
KeyConfigure extracts a small "key" from the program file and this is transferred to KeyServer for storage in the Active Controls file on Windows. The key is tagged internally with the complete program signature, version, and creation date so it is sure to match the exact keyed program version.The resulting keyed program gets a new name formed by appending the ¤ symbol to the original name. The original unkeyed program is untouched.
A new Control is automatically created as you key a program. When you launch the new keyed program copy you will see the default post-launch message which confirms that the program is under KeyServer control. Use Configure to customize or delete the message and to set up licensing options as above.
If for any reason the Control for a particular keyed program is removed from the Active Controls file, all keyed copies of that particular keyed program will become useless. To regain functionality for the keyed program copies, you can either re-key an original unkeyed program (so your KeyServer once again has a key) or use a backup copy of the Active Controls file to restore the original key and Control.
To create a Control for an application, select "Install Key..." from the Controls menu.
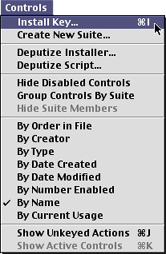
The following dialog will prompt you to select the application.
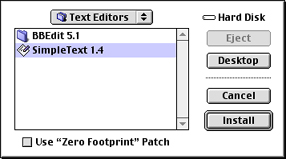
Zero Footprint
A Zero Footprint install is available to take care of a few Macintosh programs that check themselves for modifications before running. Always test a program after you key it. If it complains about being modified and will not run, drag the useless keyed program in the trash, and delete its Control (see the Clear command above). Reinstall with the Use "Zero Footprint" Patch option checked.
After you click the Install button, the tabbed Control Details dialog box appears. With this dialog box, you can tailor the Control to your requirements. Change any details that require modification and click OK.
- Documentation
- Administration
- Backup Overview
- CrashPlan Pro
- Data Rescue II
- Data Sanitation
- BRU
- Enterprise Deployment
- Iceberg
- Intro to Mac Mgmt
- iOS & Campus Exchange
- Mac OS X on Campus
- Keyserver 6
- KeyServer
- LanSchool
- Local MCX
- MPP
- Nagios Class
- Network Time
- Non Admins Scripts
- Parallel Computing
- Patch Management
- Poorly-Made Apps
- Power Management
- Power Save Mac
- Profiles - iOS 6
- Software Installation
- SpamAssassin
- Xgrid
- Authentication
- General Software
- Hardware
- Miscellaneous
- Multimedia
- Networking
- Operating Systems
- Outside Presentations
- Programming & Scripting
- Security
- Servers
- Short Courses
- System Deployment
- System Utilities
- What's New
![]() © - University of Utah -
Marriott Library -
ITS - Apple Infrastructure
© - University of Utah -
Marriott Library -
ITS - Apple Infrastructure
Disclaimer - 295 South 1500 East, Room 1705J, SLC, UT 84112 - 801.581.6494