
Photoshop Editing Basics
By: Mike Kimball - Revised: 2006-06-08 devinIntroduction
Even if you are a photographer and not a graphic designer, Photoshop is an indispensable tool for editing your photos. Enough said.In this section we'll examine a few frequently used functions that Photoshop performs for us. The basic order that I follow for this is Crop, Resize, Adjust, Sharpen, Save. I realize this forms an acronym of "CRASS", but...
Crop
Before you do anything else, you want to optimize your perspective. Camera viewfinders normally show you only 80-85% of the actual image, so you will often capture more in frame than you intended. Also, you will often end up with a different aspect ratio (the proportion of width versus length) than desired. The reason to crop before you resize is because once you resize, cropping only makes the picture smaller.Resize
Once you have your picture cropped so you have only what is desired in frame, you can resize it to the dimensions you want.Adjust
Photoshop can do some fascinating adjustments to remove color casts (also known as radiosity in the film world, it means objects reflect light, which can affect the perceived color of other objects in the area or the whole scene), or improve the brightness and contrast. Things of this nature greatly enhance the clarity and accuracy of your photos. These can be done either automatically or manually, so that if you don't like the results of the auto function then you can control it yourself.- Auto Levels, Auto Contrast - these are in the Image:Adjust menu. Basically auto levels will balance all of the colors, brightness, and contrast. This normally works rather well, but you should still pay attention to the results in case they are less than perfect. I have noticed that it tends to make ocean water appear unnaturally dark (instead of midday aqua blue). Sometimes it makes hillsides too brown instead of the more lush green that you may desire. In cases such as these, it's best to use auto contrast instead.
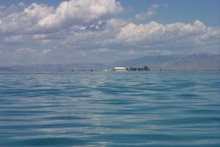
No Adjustment - a little too grey
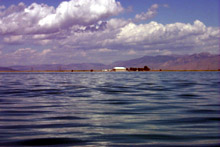
Auto levels - a little too dark
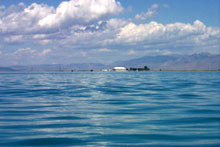
Auto contrast - best option
Sharpen
Regardless of how good the picture was when you took it, it will still benefit from at least one pass of the Sharpen filter. This is especially true after you have resized it since some detail and sharpness is always lost.Save
Once you have the image looking as you would like, you must of course save the changes. I highly suggest the Save As function so that you can change the name, keeping the original shot intact in case you want to make other copies of it (different sizes, different cropping, different adjustments, etc). It is also the Save As function that allows one to change the image compression (in Image Options, change the quality setting) - after you click the "Save" button another dialog will appear: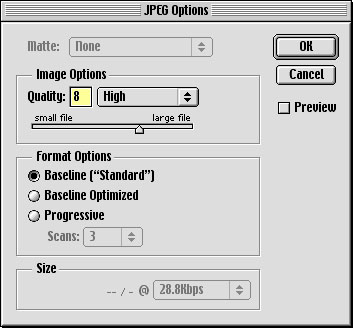
![]() © - University of Utah -
Marriott Library -
ITS - Apple Infrastructure
© - University of Utah -
Marriott Library -
ITS - Apple Infrastructure
Disclaimer - 295 South 1500 East, Room 1705J, SLC, UT 84112 - 801.581.6494