
Taking Good Pictures
By: Mike Kimball - Revised: 2006-06-08 devinIntroduction
As technology improves, digital cameras do more and more to aid users in getting good shots without a lot of hassle. Their automatic functions for focus, exposure, flash, or aperture, have greatly improved. However, there will always be conditions when using manual settings will be preferable. This section will explore the settings to keep in mind when shooting pictures.Auto-everything
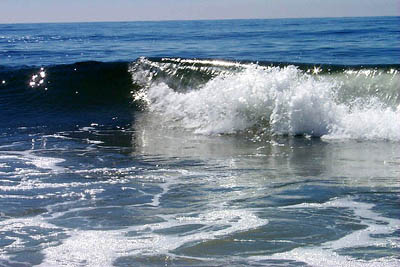
Cameras usually default to this. The camera has a sensor that determines flash, exposure, focus, and aperture settings. Sometimes it takes a bit of time for the camera to make all these adjustments before shooting the picture, so you may have to hold down the button and hold still for a second or so. Auto-everything works fairly well in a variety of different lighting and distance conditions as long as the light is not too dim.Oregon coast - this pic required no camera adjustment
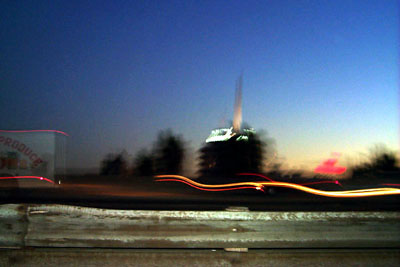
Capital Records - just pointed out the window at 70mph...
Flash adjustment
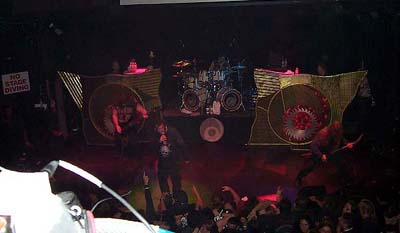
The first thing I usually have to adjust when lighting conditions become challenging, is the flash. The camera defaults to "auto", which is too bright for some settings (close-ups, light shows with lots of color, etc). There is also a "fill" setting, which softens the flash so it will light your subject without washout or spotting. There is a "red eye" setting which eliminates this somewhat creepy effect by flashing a little early so that your subject's pupils will appear normal. Finally, you can simply set the flash to "off". Turning the flash lower than it would auto-select means the exposure has to adjust for the difference, and the shutter must stay open longer. Keep this in mind - you must hold still or the picture will appear blurry. A tripod is often a useful aid. One note - sometimes the subject refuses to hold still even though you are motionless, so there will be motion blur anyway (might achieve a cool effect...)SFU, with flash - notice the foreground drowns the subject by forcing its underexposure (and the flash interferes with the stage colors)
SFU, no flash - suddenly the foreground is a shadow and the band jumps out

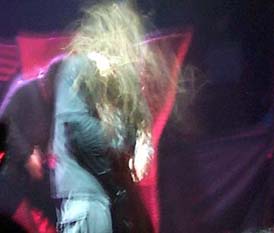
Chris Barnes motion blur - the long exposure compensates for the no flash, while he moves his head...
Exposure adjustment
The exposure setting on my Kodak DC260 varies in .5 EV gradations between -2.0 EV to +2.0 EV. In place of "0" is "auto". The auto exposure works well most of the time, in quite a range of lighting. Manual exposure is mostly useful in extreme darkness (e.g. night shots), or when shooting a series of pictures that require a uniform level of exposure (such as in QuickTime VR).Fillmore fire - the long exposure enables visible clouds, but a slightly overexposed moon (no crater detail)

Focus settings
Focus is not always an adjustable feature since most digital cameras don't have the focus adjustment on the lens, as one would expect on a 35mm film camera. One often has a simple choice of the focus algorithm, to produce a certain effect. One choice is multi-point auto, which makes everything in frame appear focused; this is the standard choice. The other is single-point auto, which picks a point in frame and adjusts the focus so this point is sharp, but the surrounding area of closer or farther distance is blurred.Aperture (f-stop)
Again, this is automatic and non-adjustable on most digital cameras, since this control is also usually on the outside of the cylinder where the lens fits. The f-stop setting interacts with the exposure and focus in that the size of the opening, like one's pupils, determines the amount of light let in, but also the depth of field and the sharpness of the focus (in inverse proportion to the size of the aperture).Owl* - short depth of field, focus on the owl but not the surroundings
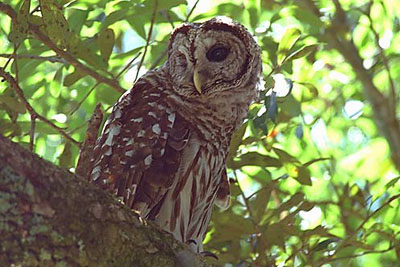
*Owl image appears courtesy of Kodak.com; all others taken by Mike Kimball.
![]() © - University of Utah -
Marriott Library -
ITS - Apple Infrastructure
© - University of Utah -
Marriott Library -
ITS - Apple Infrastructure
Disclaimer - 295 South 1500 East, Room 1705J, SLC, UT 84112 - 801.581.6494