
What We Did & Preparation
By: Mikio Moriyasu - Revised: 2006-06-27 devinIntroduction
An overview of what we decided to do, ordering our materials, and preparing the grilles for installation.Section Links
Deciding What To Do & Ordering the Materials
After examining the various solutions that we found on the Internet, it was clear that the after market speaker grilles, while useful in a controlled or closely monitored setting, would not work for our needs. They were too costly (upwards of $600 to $1600 for 100 machines), and could still be removed even if they were taped or glued into the faceplate. Taping or gluing could also damage the surface of the faceplate.Although it is significantly cheaper and more difficult to remove, wire mesh did not meet our needs either as it did not provide protection against vandalism. It also could irreparably damage the machines if it started to fray. The idea of sandwiching a protective cover between the faceplate and the speaker, however, had merit. All we needed to do was find a more durable material.
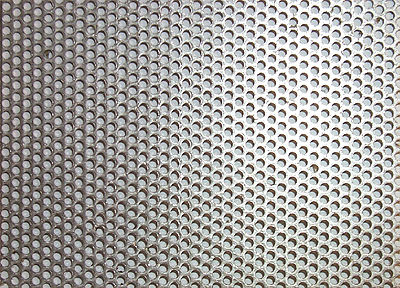
Most commercially available external computer speakers, stereo speakers, and television speakers are protected by perforated sheet metal grilles. The grilles are very durable providing protection against both accidental as well as intentional contact with what ever is behind them. If appliance manufacturers can get this material, why couldn't we.
With the help of the University of Utah Machine Shop, we contacted McNichols, a fabricator that specializes in perforated, mesh, and other similar metal products.

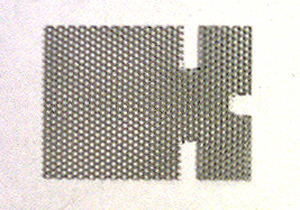
In their catalog, we found a stainless steel perforated sheet metal product that was about 1/16" thick with 1/16" diameter holes that were spaced 3/32" apart in a staggered layout.
McNichols precut 60 pieces to our specifications and had it shipped to us within two weeks.
Fitting the Grille
While each grille was cut to size at McNichols Products, in order to insert them into the machines, we had to remove some excess material so that they would fit around existing hardware.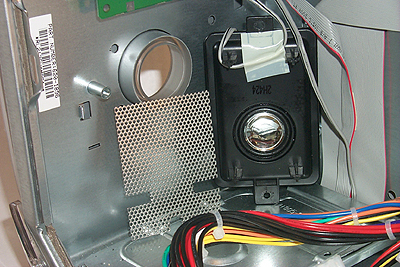
Four features governed the final size and shape of each finished grille:
- The location and size of the speaker itself
- The location of the wiring harness
- The location and size of the four supports located on the corners of the speaker unit
- The location of the left screw
Using these dimensions meant that we would have to notch each grille so as to get it around two of the four large supports located on the corners of the speaker unit. These large spacers, however, would also help hold the grille in place and prevent it from shifting during and after the reattachment of the speaker unit. We would also need to cut out a notch at one end for the screw.
The final shape and dimensions of the grille looks like this.
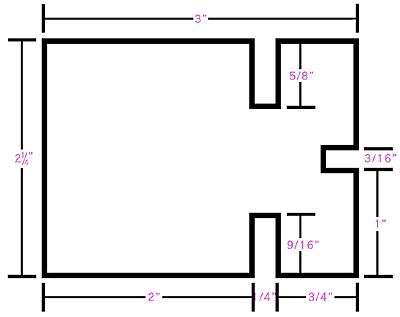
To download an oversized "blueprint" of the grille with dimensions, click here.
–
PDF-File,
49.5 KB
To download an actual size template of the grille, click here.
–
PDF-File,
12.0 KB
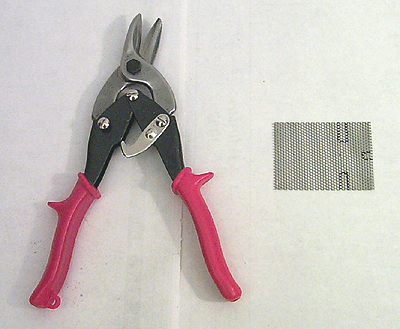
The grilles were shipped from McNichols covered in either a machining oil or some kind of anti-rust protective oil finish. The oil was applied so abundantly that some of the grilles were actually sticking to each other. Before any cutting could begin, all of this oil had to be removed. The grilles were then cut using a handheld set of heavy-duty Craftsmen tin snips.
We looked into the possibility of having the University of Utah Machine Shop cut all sixty grilles for us. We hoped that this would expedite the process so that all we would have to do is install them. After discussing our needs with Library Building Maintenance personnel familiar with Machine Shop operations, it was decided that in the end, the tin snips would be the fastest and most economical option.
Before final installation could begin, all of the bends and warpage caused by the cutting process had to be straightened out and the grille made as flat as possible.
- Documentation
- Administration
- Authentication
- General Software
- Hardware
- Miscellaneous
- Multimedia
- Networking
- Operating Systems
- Outside Presentations
- Programming & Scripting
- Security
- Servers
- Short Courses
- System Deployment
- System Utilities
- What's New
![]() © - University of Utah -
Marriott Library -
ITS - Apple Infrastructure
© - University of Utah -
Marriott Library -
ITS - Apple Infrastructure
Disclaimer - 295 South 1500 East, Room 1705J, SLC, UT 84112 - 801.581.6494