
VR Worx 2.1 Overview
By: Scott Doenges - Revised: 2006-06-21 devin
Section Links
Using VR Worx
At first appearance, VR Worx's GUI looks very nice. You see a nice Aqua GUI with plenty of controls over your camera/lens settings, image size, etc. As you click on the tabs along the top of the screen, you see that as you create QTVRs, you just need to progress to the next tab to get to the next step.
VR Worx's GUI
After entering your lens and document parameters, you go to the Acquire panel, where you load the images into VR Worx. You can either drag and drop your images into the empty spots, or use the "Single" or "Multi" buttons to import and rotate your images. The GUI is pretty neat for this pane - the circular arragement of the images make it fairly easy to orient yourself and put the images in the correct spots:
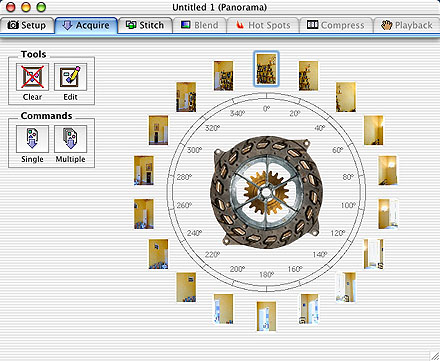
the Acquire panel
You then proceed to the Stitch panel, where VR Worx stitches your image together. You have control over the stitching "tolerance" - i.e. how far into each image the program will look for overlapping image features. After your images have been stitched together, you see a preview of your VR that you can scroll through. You can use the control in this panel to manually adjust the positions of individual images.

Tolerance settings
Next is the Blend panel, where VR Worx adjusts the brightness/contrast of your images to a more uniform value. It also has an "Edit" mode, where you can do basic image modifications such as erase, smudge, paint, text, lighten, and darken. This feature is pretty nice since it saves you the trouble of fixing small problems in each image via Photoshop. It even has a decent number of Photoshop-esque image filters you can apply to your VR, like Blur, Emboss, Film Grain, Lens Flare, etc. Not sure why you'd ever want to do most of these to a VR, but it's nice to have the option...
You can then proceed to the Hot Spots panel, where you can add Hot Spots of many shapes linking to other VRs, movies, images, or even to web URLs. This is a nice feature that Stitcher is lacking:
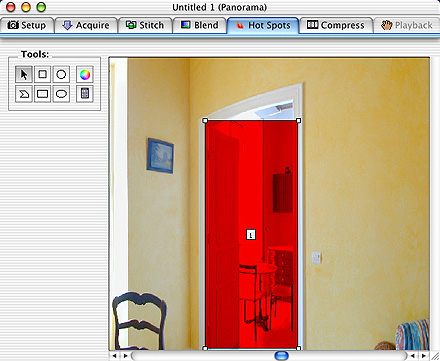
adding Hot spots...
The next two Panels are where you enter settings to compress and export your VRs to an actual .mov file. VR Worx gives you much more control over the attributes of your VR - such as VR dimensions, different playback quality and speed settings, etc.
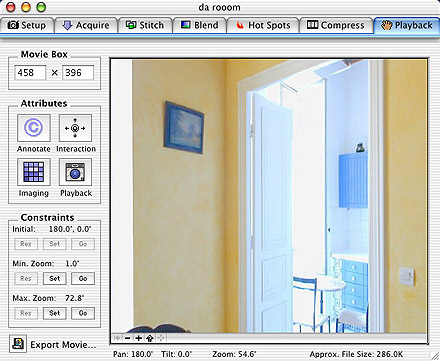
setting playback & other VR attributes...
Not only can VR Worx create Panoramas, but it can also create Object and Scene VRs (I won't go into much detail here since I'm mainly reviewing its ability to create Pano VRs). Object VRs can make "3D" rotatable movies of stationary objects, and Scene VRs can be used to splice together multiple Pano VRs into a single VR - such as a QTVR walkthrough of an entire house.
Example
This VR was made in VR Worx from Stitcher's Tutorial files. Note that even though I used the exact same images to create these panos in each application, I was able to find more image glitches/mis-matches in the VR Worx pano:VRWorx_room.mov
–
MOV-File,
537.1 KB
Conclusion
VR Worx feels a bit over-simplified at times, and it often feels too automated. However, the GUI and overall ease of use far exceed Stitcher. With its ability to create Cylindrical VRs as well as Object and Scene VRs, it has more than a few jumps on Stitcher - yet it cannot create Cubic VRs, so you'll need to determine what kind of VRs you want to be able to make.Both of these products combined have the ability to do just about everything you possibly can with QTVR...
Pros:
- Great-looking, intuitive GUI.
- Pano, Object, and Scene VR creation.
- Built-in image editing/filtering and Hot Spot controls.
- More control over VR parameters.
- Often feels too static and automated, doesn't give you enough control over your images. When I put together the same pano in each application, I was able to find more image mis-matches, or "ghost effects", in the VR Worx pano, but almost none in the Stitcher pano.
- Lens parameter settings seem very touchy - needs to be automatic like Stitcher!
- Auto image import doesn't always put your images in the right place - it's less troublesome to simply drag and drop each image separately.
- Documentation
- Administration
- Authentication
- General Software
- Hardware
- Miscellaneous
- Multimedia
- Networking
- Operating Systems
- Outside Presentations
- Programming & Scripting
- Security
- Servers
- Short Courses
- System Deployment
- System Utilities
- What's New
![]() © - University of Utah -
Marriott Library -
ITS - Apple Infrastructure
© - University of Utah -
Marriott Library -
ITS - Apple Infrastructure
Disclaimer - 295 South 1500 East, Room 1705J, SLC, UT 84112 - 801.581.6494