
Installation Basics
By: Mikio Moriyasu - Revised: 2006-06-22 devinIntroduction
How the ZephIR is installed and what is installed on the hard drive.Section Links
ZephIR Hardware Installation
Developed before the introduction of the USB Power Mac computers, the ZephIR is to plugged into the ADB port on the back of the older, beige colored CPU's. An ADB keyboard is then piggybacked onto the ZephIR's two-way plug.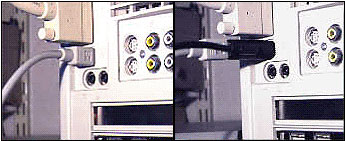
The ADB ZephIR is the only model that is currently available. StudioZee is developing a USB Zephir that is scheduled to appear in the next few months. Until then, for all USB machines, studioZee recommends using an ADB-USB adapter such as the Griffin Technology iMate.
Specifications and purchasing information for the iMate can be found at the following Griffin Technology website:
http://www.griffintechnology.com/imate/index.html (link dead)
Installed Software Components
There are four principle components that are installed onto the Hard Drive: ZephIR application
 OSAX: "Fire ZephIR Commands"
And Applescript Scripting Addition that controls the transmission of the desired infrared codes to the audio or video component.
 Preferences: "ZephZIR! Codes"
The handheld remote infrared code needed to operate audio and video components.
 Preferences: "ZephIR! Media"
The ZephIR application configuration.
- Documentation
- Administration
- Authentication
- General Software
- Hardware
- Miscellaneous
- Multimedia
- Networking
- Operating Systems
- Outside Presentations
- Programming & Scripting
- Security
- Servers
- Short Courses
- System Deployment
- System Utilities
- What's New
![]() © - University of Utah -
Marriott Library -
ITS - Apple Infrastructure
© - University of Utah -
Marriott Library -
ITS - Apple Infrastructure
Disclaimer - 295 South 1500 East, Room 1705J, SLC, UT 84112 - 801.581.6494