
Authentication & Authorization
By: Richard Glaser, University of Utah - Revised: 2007-09-28 richardIntroduction
University Network ID (uNID).The University of Utah iTunes U site includes publicly & restricted content. To access the restricted content you must have & use your University Network ID (uNID). A University Network ID (uNID) is a piece of information that uniquely identifies you to on the University of Utah network for various computing services. Your uNID is created by substituting a lower case "u" for the first zero in your University (student, employee) ID. A University Network ID is also known as a uNID, NID, username, login name or User ID. All students, faculty, and staff at the University of Utah receive a uNID.
See this page for more details about the University Network ID (uNID).
Authentication
Authentication is the process of determining whether someone or something is, in fact, who or what it is declared to be. In private and public computer networks (including the Internet), authentication is commonly done through the use of logon passwords. Knowledge of the password is assumed to guarantee that the user is authentic.
We use Kerberos for the authentication process.
Authorization
Authorization is the process of giving someone permission to do or have something. In multi-user computer systems, a system administrator defines for the system which users are allowed access to the system and what privileges of use (such as access to which file directories, hours of access, amount of allocated storage space, and so forth).
We use LDAP for the authorization process.
Authentication & Authorization Process
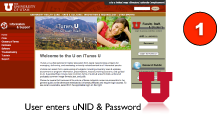
The following process is used to authenticate and authorize access to iTunes UStep 1 - User enter uNID & Password on iTunes U Web Gateway
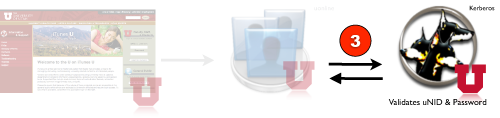
Step 2 - uNID & Password are Securely Passed to Campus Middleware Server

Step 3 - Kerberos Validates uNID & Password
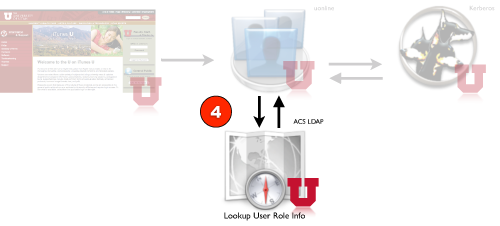
Step 4 - Lookup User Role Information in Campus LDAP Server
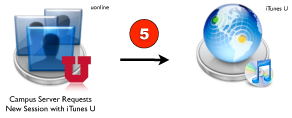
Step 5 - Campus Server Requests New Session with iTunes U
Step 6 - iTunes U Replies with URL

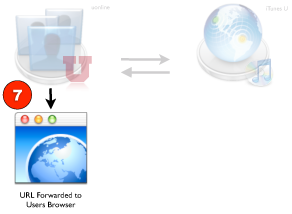
Step 7 - Campus Middleware Server Forwards URL to Users Browser
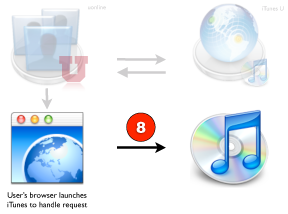
Step 8 - User’s browser launches iTunes application to handle request
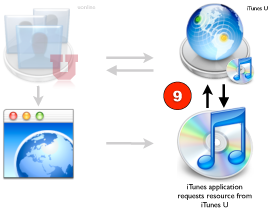
Step 9 - iTunes application requests resource from iTunes U
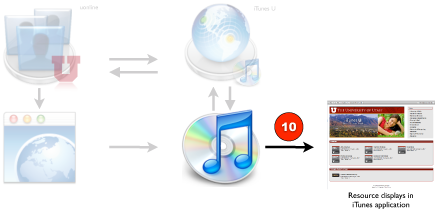
Step 10 - Resource displays in iTunes application
- Documentation
- Administration
- Authentication
- General Software
- Hardware
- Miscellaneous
- Multimedia
- Networking
- Operating Systems
- Outside Presentations
- Programming & Scripting
- Security
- Servers
- Short Courses
- System Deployment
- System Utilities
- What's New
![]() © - University of Utah -
Marriott Library -
ITS - Apple Infrastructure
© - University of Utah -
Marriott Library -
ITS - Apple Infrastructure
Disclaimer - 295 South 1500 East, Room 1705J, SLC, UT 84112 - 801.581.6494