
Macintosh Manager Overview
By: Scott Doenges - Revised: 2006-06-20 devinIntroduction
An overview of Macintosh Manager, Apple's powerful computer/user administration program.What is Macintosh Manager?
Macintosh Manager is Apple's workstation management technology, providing education mnetwork administrators with a centralized method of securing Mac OS workstations, controlling student software access, and providing a consistent, personalized experience for students and staff.When used in conjunction with Netboot, Macintosh Manager can be a powerful user-management tool. It allows your users to log on to any Netboot-capable Macintosh, and because each users' preferences are kept in their user folders on the Mac OS X Server, all of their settings (application preferences, desktop picture, etc) will be the same, regardless of which Mac they log on to.
NOTE: Macintosh Manager does not HAVE to be used in conjunction with Netboot, but most of its features are only put to use if they are used together.
System Requirements
NetBoot Admin Server:Mac OS X Server 10.x
- PowerMac G3 or G4 with a 400 MHz or faster processor.
- 256 MB RAM recommended.
- Two or more 9 GB drives (multiple drives allow NetBoot to more efficiently allocate resources).
- Gigabit Ethernet; four-port 100Base-T recommended.
Mac OS 9.x (for Netboot 2.x)
- iMac, iBook, PowerMac G3 (Blue), PowerMac G4, G4 Cube, FireWire Powerbook, or PowerBook G4.
- minimum of 64 MB RAM.
 Macintosh Manager - NetBoot amounts to very little without the additional use of the Macintosh Manager server/application. Mac Manager allows you to create complex sets of rules for different NetBoot users/computers.
Setup
Once you have the Mac OS X Server up and running, all you have to do is launch the Macintosh Manager application. Click any blue-outlined images below for a larger version.The first Pane you'll see is the Basic pane in the Users tab (shown below). This is where you manage your Netboot users, set their security options (either as a User, a Workgroup Admin, or a Mac Manager Admin), etc. The Advanced tab lets you set users' mail settings and disk quotas.
You need to use the Mac OS X Server Admin app or the System Preferences: Users pane to create and manage your Users, which you then drag-and-drop into the Users list in Macintosh Manager. Note that your Users each need to have a home directory located on the hard drive of your Mac OS X/Netboot Server, or they will not be able to save files to their directories and access them from other workstations.

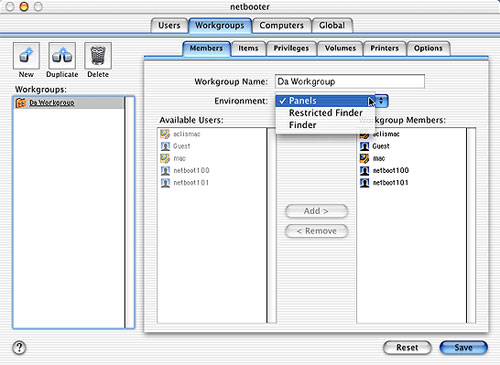
The Members pane under the Workgroups tab (shown below) allows you to allocate your members into different Workgroups, which you can then give different Finder Environments, security privileges (i.e. access to local volumes, CDs, etc), printing options, etc.). The Panels Finder Environment gives the workgroup members very limited access to the Finder - they see nothing on the desktop and are only able to access whatever has been set up in the default panel.
You need to decide how much access you want your users to have on the computers when they log in, then create separate workgroups for each set of users that you want to have different access settings. For example, if you supported a number of Macs in an elementary school, you would probably want the kids to have very limited access (using the Panels Finder environment) and you would want the teachers/staff to have more access (using the Restricted Finder or Finder environments), so you would group the student logins into one workgroup with Panels set as the environment, and the staff logins in another workgroup with Finder set as the environment.
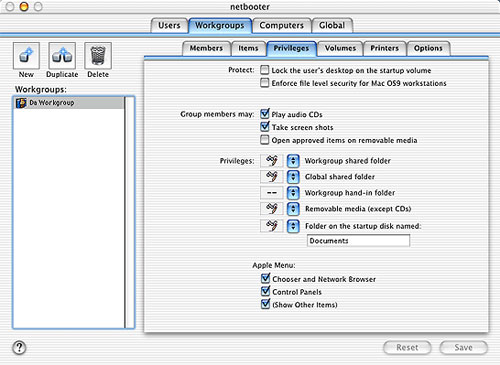
If you set a workgroup to use the Restricted Finder Environment, you can then modify which items the users can access in the Finder through the Privileges tab - for example, you can restrict them from playing audio CDs, taking screenshots, creating new folders, opening the Control Panels, shutting down, restarting, or opening the Chooser.
The settings in the Privileges pane change depending on which Finder Environment you have selected for the given workgroup. For example, the full Finder environment has limited Privileges options, but the Panels and Restricted Finder (shown below) have many more privilege options available.
The Printers pane allows you to give your Workgroups access to the printers of your choice. You can set passwords for individual printers, limit users to a certain number of pages, etc.
The Options pane gives you options to open the items in the Startup Items folder, define a Workgroup's default Documents location, and require an Admin password to eject CDs. You can also set whether a user's Preferences will be copied down to the machine on login (more options for copying users' preferences are available under the Global tab in the Security pane).
The Computers tab is where you manage different access settings for individual computers within your workgroups.
The Lists and Workgroups panes under the Computers tab allow you to manage different sets of computers and workgroups, allowing only certain workgroups to log in on certain machines.
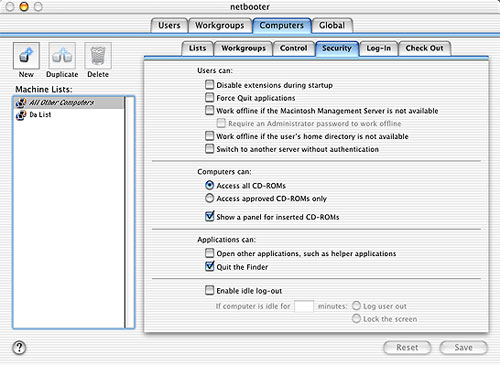
The Control tab and the Security tab (shown below) contain many options that you can set for your Computer lists. For example, the Control tab lets you force the local drive's name to a standard setting, synch the clients' clocks with the Server's clock, and manage scheduled shut down/startup times. The Security tab lets you define whether users can disable extensions, force quit applications, access CDROMs, etc.
The Login pane allows you set whether users have to type in their login name or choose it from a list. You can also set login messages and Panel names (if you're using the Panels Finder Environment).
The Check Out pane lets you select which computers in your lists can be checked out - this is only useful if you intend to manage portable computers (i.e. PowerBooks or iBooks). If a user takes a PowerBook home, the security features set in Macintosh Manager will remain in effect.
The Global tab (shown below) contains the Security and CD-ROMs tabs. The Security pane contains options for allowing guest access, allowing users to change their passwords, authenticating users via Kerberos, etc. The CD-ROMs pane lets you choose exactly which CD-ROMs you want your users to have access to. This would be particularly useful in an educational lab where you only want certain CD-ROMs to work, such as Encyclopedia CDs or class-related software.

NetBoot/Macintosh Manager Pros & Cons
Pros- Makes restoring a machine to a default configuration very easy - simply restart the computer.
- Gives Admins complete control over what his/her users have access to. Since all User data is stored on the Server, you don't even necessarily need to give your users access to write to the hard drive (assuming you use NetBoot).
- You don't NEED to use Macintosh Manager with NetBoot, in which case the number of users/machines you can manage is pretty much unlimited.
- Macintosh Manager is well documented.
- Macintosh Manager's sophisticated GUI makes configuring your server fairly straightforward.
- NetBoot is very poorly documented, and can be confusing to install/set up.
- When used with NetBoot, you're limited to 50 clients per Server (maybe fewer if you have a slow Server or a slow network).
- The DHCP Server included with Mac OS X Server has very limited options, which may cause complications (such as Windows machines that are configured to use DHCP grabbing your NetBoot client IPs and not letting them go!)
- Expensive - at least $2,799 for a Mac OS X Server machine (includes all required software) or $999 for the Mac OS X Server software (which you need to install on a G3 or G4). Would be less expensive to run on a Linux server.
- Documentation
- Administration
- Authentication
- General Software
- Hardware
- Miscellaneous
- Multimedia
- Networking
- Operating Systems
- Outside Presentations
- Programming & Scripting
- Security
- Servers
- Short Courses
- System Deployment
- Apple Network Assistant
- Apple Remote Desktop
- ASR CLI Tool
- Casper Suite
- Deep Freeze
- DeployStudio
- Entman
- HSEB Imaging
- LANrev
- Mac OS X Deployment
- MacAdministrator
- Macintosh Manager
- munki
- NetBoot
- NetInstall & NetRestore
- netOctopus 3.6.2
- NetRestore 1.5
- Puppet
- Blast Image Config
- Blast Image Config Dev
- Blast Image Config 2.9
- Radmind
- RevRdist
- Xhooks
- System Utilities
- What's New
![]() © - University of Utah -
Marriott Library -
ITS - Apple Infrastructure
© - University of Utah -
Marriott Library -
ITS - Apple Infrastructure
Disclaimer - 295 South 1500 East, Room 1705J, SLC, UT 84112 - 801.581.6494