
NetInstall & NetRestore Overview
By: Scott Doenges - Revised: 2006-06-15 devinDownload Slides
–
PDF-File,
6.4 MB
Introduction
NetInstall is Apple's new method of performing automated software installs over a network. With a few customizations and the help of NetRestore, a third-party tool, you can use NetInstall to mass-distribute Mac OS X ASR images to an entire lab.Scott will give a brief overview of customizing NetInstall images using NetRestore, and distributing ASR images via NetInstall.
Section Links
What is NetInstall? Why use it?
NetInstall, a.k.a. Network Install, was introduced with Mac OS X Server 10.2, as a method of network-booting Mac clients to distribute application software and OS updates. It utilizes NetBoot's underlying technology, but regular NetBoot uses the client's local drive as a "swapspace" to store information, so the local drive cannot be reformatted while NetBooted. NetInstall, on the other hand, uses a RAM disk to store information on the client, so the local disk is free to be reformatted and reimaged. The purpose of NetInstall is to drastically cut down on the amount of time an admin has to spend at each of his/her client Macs.Due to its nature, NetInstall is better suited to a staff environment where the administrator would simply want to install new applications or OS updates on staff Macs (i.e. "install in place"), rather than wipe entire drives to get machines back to a standard configuration. NetInstall could be used to quickly get an entire lab of machines to an initial standard configuration, but a separate maintenance application (such as Radmind, RSyncX, etc.) would still be necessary to keep these clients on a regular update schedule.
Mac OS X Server 10.2 includes PackageMaker, a tool to make your own package installers. Once you've made your own installers, you can add them to the NetInstall boot volume and configure them to be automatically installed on your clients.
Using NetInstall
To create a default NetBoot or NetInstall boot images, you use the Network Image Utility, which is included with Mac OS X Server 10.2. Note that you'll need to have a Mac OS X (Client or Server) install CD inserted in your Server's CD drive, since the Network Image Utility creates the images from resources located on the CD.
Open Network Image Utility, and select "Network Install" from the Image Type menu, choose an Image ID (whatever you want, as long as you don't duplicate this ID on another image), and select "enable automated install":
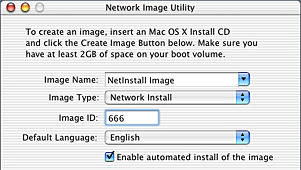
Then click "Create Image" and let it spin its wheels - it may take 20 minutes or so. The resulting image will be located in your default NetBoot sharepoint, usually /Library/NetBoot/NetBootSP0/
Now you need to create your custom packages and add them to the NetInstall image. To do this, unlock your NetInstall image (you may need to mess with the privileges using XRay or a similar app), and mount the image. You can then copy existing package installers (such as MacOSXUpdate10.2.4.pkg) to your image, in /System/Installation/Packages/, or you can use PackageMaker to create custom packages of applications or OS updates.
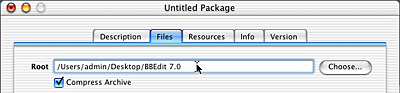
Open PackageMaker and locate/select all of the resources you'd like to include in your package:
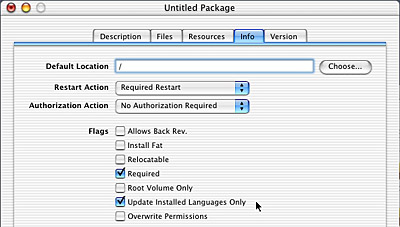
Choose the desired options (such as "Required Restart", "Authorization Required", etc):
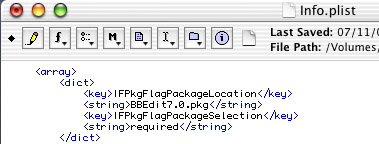
Then save your package and copy it into /System/Installation/Packages/ on your NetInstall image. You then need to add the package information to Info.plist, located inside the OSInstall.mpkg located in that same directory. Duplicate an existing entry, and add the name of your package, as shown below:

Now unmount and lock your NetInstall image and enable your image in the NetBoot/DHCP panel of Server Settings. Test out your NetInstall image on a client by selecting the Network boot volume in the Startup Disk preference pane, and make sure that your custom packages get installed as they should.
What's missing from NetInstall?
Nifty though it may be, NetInstall is not an ideal way to perform regular maintenance on a large number of clients since it lacks full automation. It may be useful to admins who want to install apps on multiple staff Macs without having to visit each one with the installer CD, however custom packages are a bit of a pain to create. Also, standard NetInstall has no simple way of removing items from a hard drive that an admin wouldn't want to be there (such as games, sensitive documents, etc).This is where NetRestore and ASR come in...
Using NetRestore with NetInstall
Thanks to Mike Bombich, creator of Carbon Copy Cloner, NetInstall can be customized to be much more useful to lab admins. NetRestore utilizes the command-line version of Apple Software Restore (ASR) that was included with Mac OS X 10.2.2. Mike also kindly created NetRestore Helper, which actually converts standard NetInstall images into whizz-bang NetInstall-NetRestore images. NetRestore's GUI has complete control over all command-line ASR functions (including buffer sizes, which can be modified in the Advanced Settings window).When you NetBoot a client from a modified NetInstall/NetRestore image, NetRestore opens up and lets you perform an ASR restore to the local drive from either an AFP, HTTP, or local location.

To create a NetInstall/NetRestore image, first create a standard NetInstall image using the Network Image Utility, as shown above. Note that you must use the Mac OS X Server 10.2 CD to create this image, rather than a 10.2 Client CD, since NetRestore depends on certain components being on the NetInstall image.
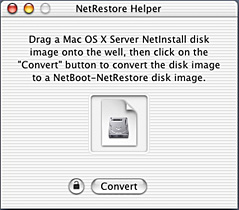 After creating a standard image, unlock the image using XRay, and open up the NetRestore Helper. Click the lock, authenticate, and drag your NetInstall image onto the app window.
It will mount your image and add a bunch of components (such as AppleScript stuff, frameworks, and the NetRestore application itself). When it's done modifying your image, it will ask you if you want to modify the configuration files for NetRestore.
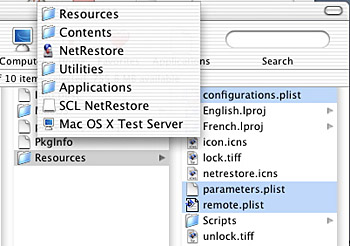
Click "Yes", and the plists will be opened up in Property List Editor, or you can click "No" then locate these files yourself in /Applications/Utilities/NetRestore/Contents/Resources/, then open them up in a text editor.
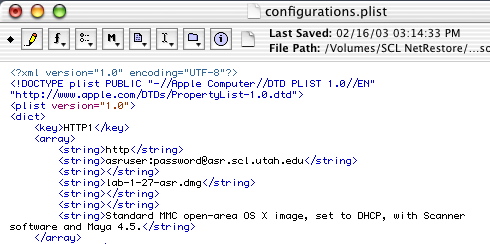
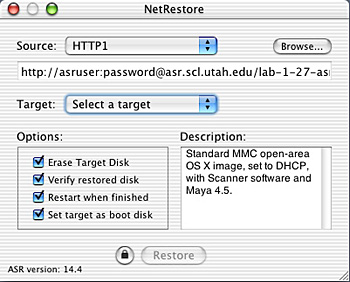
Edit configurations.plist to your liking. This file contains information about preset configurations for different ASR image locations, such as protocol (AFP, HTTP, etc), address, share name, image name, and image description. You can create as many configurations as you like. Note that if you plan on using HTTP ASR restores, your ASR images must reside on an Apache web server.
Edit parameters.plist to your liking as well. This file contains self-explanatory toggles for making NetRestore fully automated, such as eraseTarget, setTargetAsBootdisk, shouldRestart, targetDiskName, etc. Set these to <true/> or <false/> as desired. Note that NetRestore will only be fully automated if it encounters no errors. The targetDiskName variable may be a sticking point if your clients' local drives aren't uniformly named:

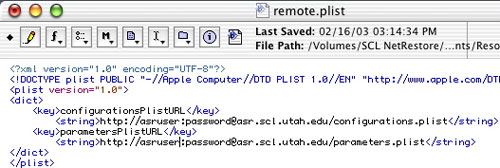
You can also choose to use remote.plist, which simply contains network addresses for remotely-stored copies of your configurations.plist and parameters.plist. This is a pretty handy option - you can put these plists onto your web server and only modify those copies instead of having to open up your NetInstall image every time you want to make a change:
Once you've modified these plists to your liking, save them and if necessary copy your plists to the locations you specified in remote.plist. Even if you're using remote.plist, it's a good idea to keep copies of your plists inside the NetRestore app in case NetRestore encounters a problem trying to access the remote copies.
Now you just need to unmount and lock the image, and enable your modified NetInstall/NetRestore image in the NetBoot/DHCP panel of Server Settings. To test your image, try to NetBoot a client by selecting the Network boot volume in the Startup Disk preference pane and restarting. Your client should then NetBoot and open NetRestore.
If you didn't set it to fully automated mode, you'll be able to select your different configurations and options, then perform the restore manually:
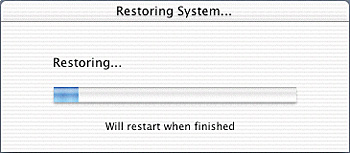
If you've set NetRestore to be fully automated, it will then start performing a restore (assuming it had no errors):
What's Missing from NetRestore?
To be honest, nothing. It's a great app and it has full control over all of command-line ASR's functions, even down to the memory buffer sizes. However, it would be cool if NetRestore could:- Set static IP on clients after restoring.
- Set open firmware password on clients after restoring.
- Create bootable NetRestore CDs to perform ASR restores on older Macs (Blue & Whites and early iMacs).
Things to Consider
DHCP ServersMac OS X Server's built-in DHCP server kind of sucks in that you can't set up static configurations. It will hand out IPs to anything looking for a DHCP response, including PCs. So if you share a subnet with PCs, watch out. If not, go ahead and use the built-in DHCP Server.
If you've got an existing DHCP Server on your subnet, your administrator probably doesn't want you to enable Mac OS X Server's built-in DHCP Server. Most non-Apple DHCP server's cannot forward the necessary NetBoot image information to NetBoot 1.x clients (Blue & Whites and early iMacs).
There are several 3rd-party DHCP Server options, though no others for Mac OS X. IPNetRouter and Vicomsoft DHCP Server both work fine but only run in OS 9. Or there's always Windows Server's DHCP server, which also works fine.
ASR Image Security
If you're using HTTP to perform your restores, your ASR images probably aren't very secure. If someone were to figure out that you've got ASR images of a complete working Mac OS X system, they could theoretically download them and restore your stuff onto their own system.
To resolve this problem, create secure "sites" or "realms" with your Apache web server. Create an ASR user, and only give that user access to the ASR images. Of course, you'll need to accordingly adjust the HTTP ASR image locations in configurations.plist to include the username and password (i.e. "http://user:password@asr.whatever.com/asrimage.dmg"). This will get sent as plan text over your network when you perform a NetRestore, so if someone is nosy enough they could still figure out how to get to your images.
Links
Useful links on using and troubleshooting NetInstall, NetRestore, and ASR:- Creating & Using ASR images
- Creating Network Install Images (link dead)
- NetRestore 1.0.2
- Mike Bombich's ASR tips (link dead)
- Carbon Copy Cloner 2.1
- Documentation
- Administration
- Authentication
- General Software
- Hardware
- Miscellaneous
- Multimedia
- Networking
- Operating Systems
- Outside Presentations
- Programming & Scripting
- Security
- Servers
- Short Courses
- System Deployment
- Apple Network Assistant
- Apple Remote Desktop
- ASR CLI Tool
- Casper Suite
- Deep Freeze
- DeployStudio
- Entman
- HSEB Imaging
- LANrev
- Mac OS X Deployment
- MacAdministrator
- Macintosh Manager
- munki
- NetBoot
- NetInstall & NetRestore
- netOctopus 3.6.2
- NetRestore 1.5
- Puppet
- Blast Image Config
- Blast Image Config Dev
- Blast Image Config 2.9
- Radmind
- RevRdist
- Xhooks
- System Utilities
- What's New
![]() © - University of Utah -
Marriott Library -
ITS - Apple Infrastructure
© - University of Utah -
Marriott Library -
ITS - Apple Infrastructure
Disclaimer - 295 South 1500 East, Room 1705J, SLC, UT 84112 - 801.581.6494