
ASR via Disk Copy/Command-line
By: Scott Doenges - Revised: 2006-06-06 devinIntroduction
Learn how to clean up your source Mac, create an ASR image with Disk Copy or command-line, and restore an ASR image with command-line.Section Links
Clean up your Source Mac
After setting up your Source Mac the way you want it, you'll need to boot from your Admin partition/drive and remove certain machine-specific files from the Source partition that would interfere with mass-distribution of your image.One common problem which you may need to resolve at this point is the ByHost preferences issue. See the Common Issues section for more info.
You can either do these steps manually via the command-line, as shown below, or use Carbon Copy Cloner or imageJaguar, whose imaging processes automate many of these steps:
Remove cache files:
sudo -s
cd /Volumes/<source volume name>
rm private/var/vm/swapfile*
rm private/var/db/volinfo.database
rm private/var/db/NetworkInterfaces.xml
rm private/var/db/BootCache.playlist
rm Library/Caches/com.apple.LaunchServices.LocalCache.csstore
rm System/Library/Extensions.kextcache
rm private/var/db/SystemConfiguration/com.apple.PowerManagement.xml
If you didn't already do this while booted from the Source partition, you may also want to restrict access to applications that were not part of the default Mac OS X installation:
sudo chown -R root:admin /Volumes/<source volume>/Applications/<application name>
sudo chmod -R go-w /Volumes/<source volume>/Applications
sudo chmod -R go-w /Volumes/<source volume>/Applications
If you want your image to automatically run the Apple Setup Assistant on startup, so that your user can setup his/her own user account, use the following commands:
cd /Volumes/<Source volume>
sudo rm private/var/db/.AppleSetupDone
sudo rm private/var/db/.AppleSetupDone
You can also remove the Admin account that you used to set up the image using the following commands:
sudo nicl -raw private/var/db/netinfo/local.nidb delete /users/admin
sudo rm -rf Users/admin
sudo rm -rf Users/admin
You should now run Apple's Disk Utility and repair any directory problems on the Source volume. If you don't do this, your ASR image may have directory problems, which would then get propagated to your target machines when you restore them.
Creating an ASR Image with Disk Copy
Once you've gotten your Source partition to the point where you're ready to create an image of it, boot from your Admin partition/drive and follow these steps:
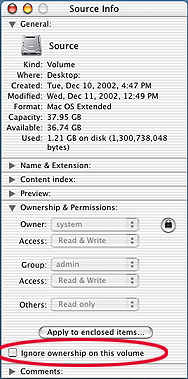 You can use Disk Copy to create an image of your Source Mac (which is a lot simpler than doing it with the command-line). Before you image your drive, you need to make sure that permissions are NOT enabled on the Source volume. The easiest way to do this while booted from your Admin partition/drive is to use the Finder to "Get Info" on your Source drive, then expand the "Ownership & permissions" tab, and make sure the "Ignore ownership on this drive" check box is unchecked. This will leave intact all of the permissions you set on your Source drive. Do NOT mess with the ownership & permissions at this point!
Now to create an image, simply open up Disk Copy (the version that came with 10.2.2, v54.3), and choose File> New> Image from Folder or Volume (do NOT choose "Image from device", or your image will only fit on drives which are the same size as your source drive). Choose your Source drive/partition, and select "Image". Now choose a place to save your image, (and keep in mind that you will likely have problems if you try to save a +2 GB image to a network volume), and make sure the "Image format" is set to "compressed" (ASR can only scan read-only disk images, so you either need to create your image as "compressed", which is read-only, or simply set it to "read-only". Compressing will obviously save a lot of space).
Just click "Save", and let it spin its wheels for a while - a 4.3 GB image took about 30 minutes to save and compress when I tested this, and ended up being about 2.1 GB compressed.
See the Additional notes section of this page for details on doing all of the above using the command-line (which is a big pain in the neck).
Now you're ready to do a test-restore of your image.
Restoring an ASR image via command-line
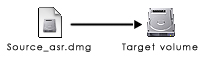
You now use the "asr" Terminal command to copy the contents of your newly-created ASR image to your Target partition (or to another Mac). While still booted from your Admin partition/drive, open Terminal and type the following command:sudo asr -source /<Source ASR image.dmg> -target /Volumes/<Target volume> -erase
When I performed a restore with a 2.1 GB compressed image, it took about 15 minutes to complete. Note that if you do not use the "-erase" option when restoring an image to a drive, ASR will attempt to do a "restore in place," so it will revert to slow file-by-file copying instead of the faster block-level restores you achieve by erasing the target volume.
If you restored to another partition on the same Mac your Source volume is on, after the restore completes you will see two volumes named "Source" (or whatever you called it). You can tell which is the newly-restored volume by the fact that you'll be able to see hidden files and directories (i.e. "var", "tmp", "mach.sym", etc.) at the root of the volume.
Now try booting from the volume you just restored, and do extensive testing to make sure your image works exactly how you want it to. If you find something amiss, boot from your original source volume and fix the problems, then recreate your image and test it again.
Assuming your image works how you intended it to, you're now ready to mass-distribute your image to your clients. Proceed to step 4 on the main page.
Additional notes
Creating an ASR image with the Command-lineIn some cases you may need more control over the creation of your ASR image than Disk Copy, Carbon Copy Cloner, or imageJaguar have to offer (although using these utilities makes ASR image creation a heck of a lot easier). But if necessary, you can use the command-line to create a blank disk image and copy over your ASR Source volume. To do so, follow these steps:
- Create a blank disk image. You can specify the initial capacity of your image with the "-size <value>" option. The "-stretch <value>" option lets you specify the maximum capacity of your image:
hdiutil create /Source.sparseimage -volname <Source volume> -size 40g -fs HFS+ -stretch 100g
- Mount your disk image. You ought to create a temporary mount point in order to avoid name conflicts with your original Source drive:
hdid -nomount /Macintosh.sparseimage
mkdir /Volumes/tempMountPoint
mount -t hfs /dev/disk0s9 /Volumes/tempMountPoint
disktool -r
sudo vsdbutil -a /Volumes/tempMountPoint
mkdir /Volumes/tempMountPoint
mount -t hfs /dev/disk0s9 /Volumes/tempMountPoint
disktool -r
sudo vsdbutil -a /Volumes/tempMountPoint
- Copy your Source to the blank image. This step is fairly complicated and involves a lot of terminal commands (again, using Disk Copy, Carbon Copy Cloner, or imageJaguar to create an image from a volume is much easier!). You basically need to copy over the contents using the ditto command, making sure that everything is kept intact, including resource forks, permissions, etc. An example would be:
sudo ditto -rsrcFork /Volumes/<Source vol>/Apps /Volumes/tempMountPoint/Apps
- Convert your disk image to read-only compressed. The "asr -scan" command, which you use to create the proper checksum resources to do ASR restores, cannot scan read-write images, so you must convert it to read-only or read-only compressed. "UDRO" represents read-only, and "UDZO" represents read-only compressed:
hdiutil convert -format UDZO /Source.sparseimage -o /Source_asr.dmg
- Scan your image for ASR. This provides the ASR image with the checksum resources that enable ASR to do fast block-level restores, versus slower file-by-file restores:
sudo asr -imagescan /Source_asr.dmg
Additional ASR options
In some situations you may also need even more control over ASR, and there are several command-line ASR options only accessible via the command-line:
In some situations you may also need even more control over ASR, and there are several command-line ASR options only accessible via the command-line:
- -rebuild - causes the desktop database on target (used by Classic System Software) to be rebuilt.
- -nocheck - skips the verification steps normally taken to ensure that a volume has been properly restored. -nocheck allows images which have not been ASR-scanned to be restored.
- -disableOwners - prevents the default owner-enabling behavior for source and target. Enabling owners is usually very important for an accurate file-by-file copy to be made. In block-copy restore mode, -disableOwners has no effect.
- -csumbuffers and -csumbuffersize - allows a different buffer configuration for checksumming operations. Two checksum buffers is a minimum for good performance, especially on dual-processor machines. Without these options, checksumming operations will use the same buffer configuration as copying.
- -buffers <num> - specifies that <num> buffers should be used.
- -buffersize <size> - specifies the size of each buffer.
- -csumbuffers <num> - specifies that <num> buffers should be used for checksumming operations (which only affect the target).
- -csumbuffersize <size> - specifies the size of each buffer used for checksumming.
- Documentation
- Administration
- Authentication
- General Software
- Hardware
- Miscellaneous
- Multimedia
- Networking
- Operating Systems
- Outside Presentations
- Programming & Scripting
- Security
- Servers
- Short Courses
- System Deployment
- System Utilities
- What's New
![]() © - University of Utah -
Marriott Library -
ITS - Apple Infrastructure
© - University of Utah -
Marriott Library -
ITS - Apple Infrastructure
Disclaimer - 295 South 1500 East, Room 1705J, SLC, UT 84112 - 801.581.6494