
netOctopus Features
By: Scott Doenges - Revised: 2006-06-21 devinIntroduction
Information about netOctopus features including the Computers window, the Information Items window, installing files, and creating installer scripts with FileScripter.Section Links
The Computers window
Once you have installed the Admin and Agent software on the desired computers and made the proper settings on each Agent, you can open the Admin application and search through the AppleTalk/IP/IPX zones/neighborhoods to find all of your computers. They will show up in the "Computers" window: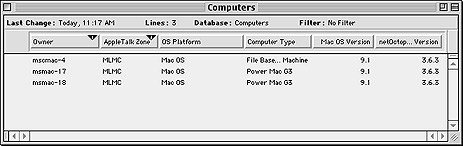
with some basic information about each machine (I will later discuss making your own templates to customize the information items shown). If you double-click on any of the computers in this list, you will see a window with more details about the machine:
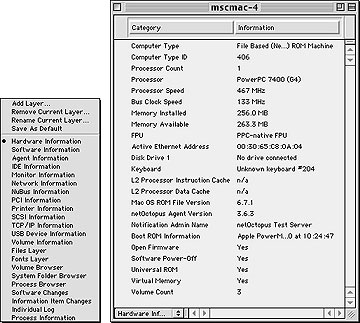 As you can see, this window tells you nearly anything you'd want to know about any given computer on your network. This window is also customizable - you can drag-and-drop any item from the Information Items window onto this window to get more information about each machine.
These are the built-in computer information layers:
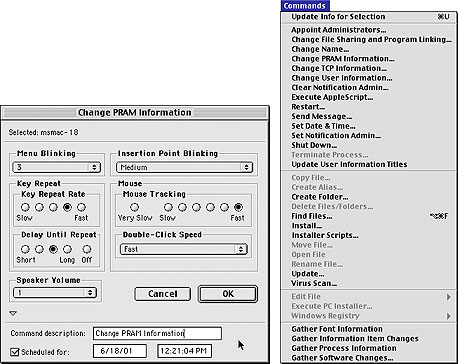
netOctopus allows the Admin to do any of the following commands pictured in the menu below. All of the commands are fully scheduleable, allowing the Admin to send a warning message before the command is executed. Some of the more notable commands include:
Change File Sharing: Allows the Admin to toggle File Sharing on and off.
Change PRAM information: Lets the Admin change any of the PRAM settings (see image).
Installer Scripts: Used in conjunction with FileScripter, you can create your own Installer Scripts to run on multiple computers.
The Information Items window
This is perhaps netOctopus's most sophisticated feature - a database over 400 different hardware, software, and system details that you can instantly retrieve from any computer on your network.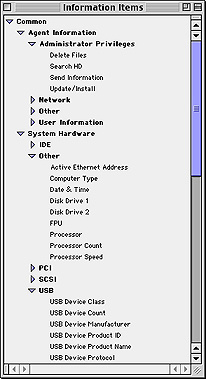 This image shows only a tiny part of the available items.
So what are all of these items for? How do you use them?
For example, say that you have a network with 200 computers, all with netOctopus, and you want to install some software on a very select group of them (which consists of 50 machines). Rather than going around to each machine and installing the software manually, you can use netOctopus's Information Items to create a filter and a template that will automatically narrow down your list to your exact specifications. You could go through your computer list and manually select each computer you want to install it on, or you could create a template that you can keep that will speed up any subsequent updates.
Say that you want to install Photoshop 6.0 on all of your Macs that have a at least a 400 MHz processor, have at least 128 MB of RAM, have Virtual memory enabled, and whose monitors support millions of colors at 1024x768 (I'm not sure why you'd want to do this, but it's just an example!).
You create a new Template and simply drag-and-drop the desired items from the Information Items window onto the top column of the new Template window. In this case you'll want "Computer Name", "Memory Installed", "Processor Speed", "Virtual Memory", "Monitor Depth", and "Monitor Resolution Size".
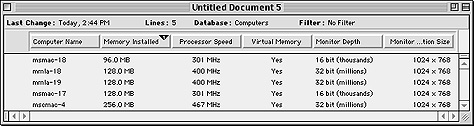
Once you've created your new Template, you then double-click the desired AppleTalk/IP zone to re-search the zone for netOctopus Agents. After a moment your machines will show up in the new template window, displaying the desired information.
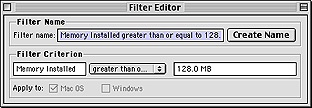
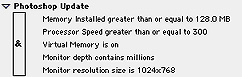
So you've now got a list of all your computers with the desired information, but certain ones are showing up that you don't want to do install the software onto. This is where Filters come into play. You can create a Compound Filter, which is actually one filter made out of multiple filters, to fully narrow down your list. As pictured below, you need to create a filter for each stipulation in your list (i.e. 128 MB RAM, 300 MHz, Virtual Memory, etc), then drag them all into a compound filter. Then you just need to drag the filter onto your computer list and you're ready to run the installer.
The finished compound filter:
Now when the Photoshop 6.0.2 update comes out, you just need to open up your ready-made template, apply your filter, and run the installer scripts on your list.
Another example: Say that you want to update Lightwave 6 to 6.5 on 50 Macs on your network. Trouble is, they're not all the same type of machine - you have 20 Blue & White G3s, 20 G4s, and 10 G4 Cubes. Since you can't filter your list by CPU type, you'll have to figure out what all of the machines have in common. With Lightwave it's easy - they all have a USB dongle. You can use the Information Items to make a new Template that will list the USB Device Vendor, and create a filter that will only show machines whose "USB Device Vendor" column contains "Rainbow Technologies, Inc.", or whose "USB Device Product Name" contains "USB Token".
For a complete (and very large) list of available Information Items click here.
Installing files with netOctopus
This option allows you to install files remotely on netOctopus Agents. You just need to select the desired computers, choose "Install..." from the Commands menu, then drag the items you wish to install onto the Installer window. You can specify where and when you'd like to install the items: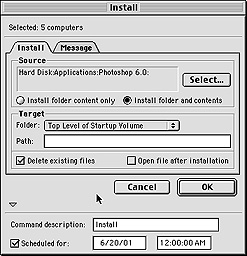
Creating Installer Scripts with FileScripter
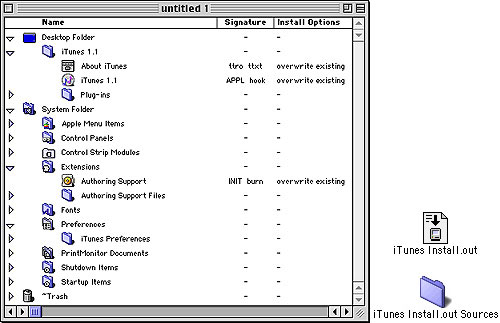
FileScripter is one of the nicest features of the netOctopus package. It allows you to create your own installer scripts, then run them on multiple computers - especially useful if you have to install the same software on 200 computers.In this example, I just went with something simple - iTunes 1.1. All you need to do is separate all of the components of the software you wish to install (i.e. Extensions, Applications, Control Panels, Prefs, etc) then drag each item onto its proper folder in the FileScripter window.
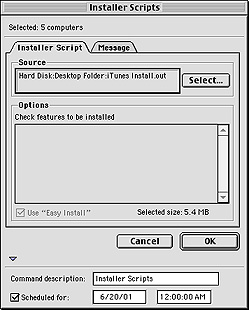 Then you just need to save it as an Installer Script, use netOctopus to select the computers you wish to install it on, then drag your installer script onto netOctopus. Again, you can schedule these tasks to take place in the middle of the night if you wish, in order to cut down on network traffic (which means you need to leave the netOctopus Admin application open on your machine).
There are options in FileScripter to replace items with the same names, delete old versions of the software you're updating, or move the outdated versions elsewhere on the disk. This would make sure you don't have multiple versions of the same software on the Clients' hard drives.
If you wanted to, you could use FileScripter to create a complete System/Software image for any given machine. So if you had a lab of 50 G4s and 50 G3s, you could set up installer scripts that contained the entire contents of the hard drive of each type of machine, including the entire System Folder, all of the applications, etc. Then if a user were to fry a machine, all you'd need to do is run the proper installer script to get the machine back to its standard System/Software set. Of course, these scripts would be huge - around 2 GB apiece - but they would make the job of reviving a dead machine a lot easier!
- Documentation
- Administration
- Authentication
- General Software
- Hardware
- Miscellaneous
- Multimedia
- Networking
- Operating Systems
- Outside Presentations
- Programming & Scripting
- Security
- Servers
- Short Courses
- System Deployment
- System Utilities
- What's New
![]() © - University of Utah -
Marriott Library -
ITS - Apple Infrastructure
© - University of Utah -
Marriott Library -
ITS - Apple Infrastructure
Disclaimer - 295 South 1500 East, Room 1705J, SLC, UT 84112 - 801.581.6494