
Basic Strategy
By: Mike Kimball - Revised: 2006-06-28 devinIntroduction
This strategy is recommended for beginners, or users who want to get started quickly. The advantage is its simplicity and easy setup. This strategy places the emphasis on the master image - it requires few lines of code in the distfile(s). Most of the work is in configuring a machine with the set of software you wish to distribute, which is then copied to the server - this will be the image to which RevRdist will synchronize all its machines.Section Links
How To
Suppose you have a room with fifteen G4's in it. You want all fifteen to have the same configuration of software, same appearance. You want to Restore the software that gets moved or deleted, and Clean the machines every day to get rid of all the Garbage that people put on them. And you don't want to do it by hand.Create a master image
A master image is simply a folder on a server, which contains the exact contents that you want all your Hard Drives to have (i.e. System Folder, Applications, Documents, etc). Pick a machine in your lab and configure it so it contains everything you want, including the arrangement of all the folders as well as all System settings and preferences. Then copy the entire contents of the hard drive to the server folder you wish to use. If you are starting from scratch, it's good to do a clean install of the Mac OS, then install all the application software. Just make sure that your master image contains all software you want, and looks exactly as you want it to look - RevRdist will duplicate it exactly.
One thing to remember - RevRdist doesn't "create" folders simply through lines of code in the distfile - it only copies existing folders. So you have to include all folders in your image, even empty ones. See below:
Contents of RevRdist Monkey : PowerMac G4/500 Mac OS 9.1
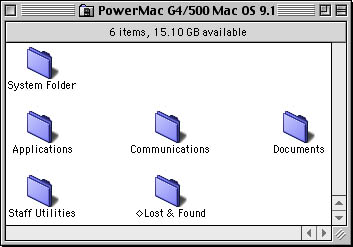
This is our example, but you can arrange things however you like. The "Applications" folder would contain all our application software (e.g. Photoshop, MS Office, AppleWorks, QuickTime, QuarkXPress, Illustrator, Virtual PC, etc), the "Communications" folder would have all internet software (e.g. Netscape, IE [if you must], Telnet, Yahoo Messenger, Fetch, Eudora, iCab, Opera, CITRIX ICA, etc), and the Documents and Lost & Found folders will most likely be empty. Our "Staff Utilities" folder would contain Norton, DiskWarrior, MacLinkPlus, CanOpener, etc.
Settings you shouldn't set
Do not use the Setup Assistant to give the machine a name. You actually want the Owner Name and Computer Name in the System file to be blank when you copy it to the master folder. Otherwise, when you distribute it to all your machines, they'll all think their names are "Macintosh HD" or something, and will produce an error on startup. See the ResEdit Hacks section on how to fix this after the fact.
If you are assigning IP addresses manually, you probably shouldn't include this preferences file in your master image, and should make sure there's a line of code in your distfile that ignores it.
Create a read-only user account
RevRdist needs an account with read rights to the server folder where your master image resides. DO NOT USE AN ADMIN OR EQUIVALENT ACCOUNT. (Believe me, I've seen people do this.) RevRdist does not modify anything on the server, it only executes the instructions in the distribution control file (distfile).
RevRdist application and preferences
The two items that sit on the individual client machines and do the synchronizing are the application, and the preferences file.
See our downloads page to download RevRdist and RevRdist documentation.
RevRdist Prefs
You have to tell the prefs file how to log in, where the distfile is, where the master image is, etc. The RevRdist app itself can create this pref file, but we usually just duplicate an existing one and then use ResEdit to change the one or two settings that are different. (Go to ResEdit Hacks page for download info.)
 Open the RevRdist Prefs file in ResEdit, and find the STR resource (selected in picture to left). Double-click on this resource icon.
 To configure the settings, double-click on the item you wish to set (as with the Password resource, selected here).
All of the resource windows look like this one (this is the "Directives file" resource; simply enter the path to your RevRdist distfile):
Distribution control file (distfile)
This is the set of directives that RevRdist uses to determine what gets copied, deleted, ignored or modified on the client machine. It can be created with a text editor such as SimpleText, though we definitely prefer BBEdit (Lite version is free) due to its extra functions (such as multiple-file find and replace, which we use constantly to manage our distfiles). This document will reside on the same server as the image. Writing the distfile is explained in greater detail on the distfiles page.
Testing
Once you are sure you have all the settings in your image, distfile, and prefs file configured correctly, just put the RevRdist app and Prefs file on your test machine (both should be in the same folder, but will run from anywhere on your hard drive). Double-click the RevRdist app (but only if the prefs file is named "RevRdist Prefs", otherwise just drag and drop the pref file on the app). Wait for it to run and then restart, and check to see if the machine looks as it should and contains all the proper software. Run a web browser to test networking, run the major apps to test that they work right (i.e. prefs, licensing, etc).
Keep in Mind
Although this is an easy way to maintain machines which have few or no configuration differences, it is not as powerful as the advanced method. Because everything is in one master image, all updates must be added in addition to or overlapping the old software. This makes it difficult to downgrade software if a problem is found, added to the confusion of any control panels, extensions, or other system components that get installed or removed. Also, if there are multiple master images, then the software must be copied to each individual image (including the myriad of accompanying extensions and prefs...) Imagine having to keep five or six copies of a 400+ MB software package such as MS Office 2001. We find that it is much easier to do copy and paste in text files (the distfiles using BBEdit) than to move a lot of files around. So eventually, it benefits you to progress to the advanced method.Download
See our downloads page to download our basic RevRdist template. Contains RevRdist applications, example distfile and prefs file, sample RevRdist Server folder hierarchy, custom Hard Disk icons, a Read Me explaining the examples, and bookmarks to this site and Purdue's site.- Documentation
- Administration
- Authentication
- General Software
- Hardware
- Miscellaneous
- Multimedia
- Networking
- Operating Systems
- Outside Presentations
- Programming & Scripting
- Security
- Servers
- Short Courses
- System Deployment
- System Utilities
- What's New
![]() © - University of Utah -
Marriott Library -
ITS - Apple Infrastructure
© - University of Utah -
Marriott Library -
ITS - Apple Infrastructure
Disclaimer - 295 South 1500 East, Room 1705J, SLC, UT 84112 - 801.581.6494